Showing posts with label Appetizer. Show all posts

Monday, February 7, 2011

Winter Salads


At this time of year, in order to keep myself sane, I need to work to find things that I like about winter. Some of those things are fires on cold nights, citrus, skiing, and winter salads. In fact, I might like winter salads better than summer salads, and it's really a relief that something is better in the winter than in the summer. I would say that the lack of bugs is another thing that's better in the winter, but there are currently stinkbugs in my house, so that one no longer applies.

Call me crazy, but winter salads tend to have a crunch, a bitterness, and a heartiness that's missing in the more delicate (dare I say wimpier) summer salads. I find them more interesting than salads made from wilty little green leaves because they have so much more character and personality. They're not always easy to get along with, but it's worth making the effort. 

After the holidays I really need to take a break from cookies and creamy things, and these flavor-packed salads get me wanting to eat salads, as opposed to eating them because I think I should because I'm a fatty. I recommend that you give these salads a try--their peppery bite just might add some needed brightness to your gray days. They work for me.


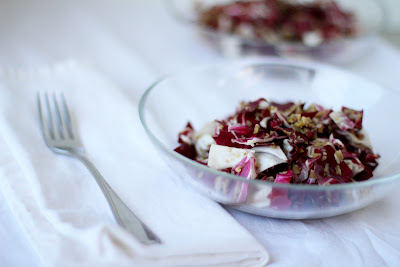
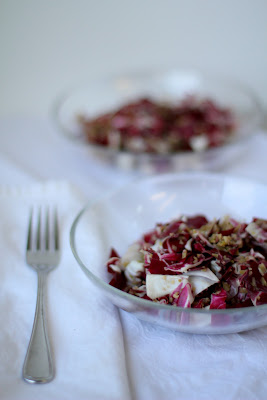
Radicchio Salad with Green Olives
(By Molly Watson of The Dinner Files)

Serves 2-4 
  • 1 head radicchio
  • 18 green olives
  • 1 teeny glove garlic
  • 2 tablespoons olive oil
  • 2 tablespoons lemon juice or sherry vinegar
  • A pinch of sugar
  • Salt to taste
  • Freshly ground black pepper to taste
  • Freshly grated Parmesan for garnish (optional)

Trim radicchio and cut or tear into bite-size pieces, and place in a large bowl. Mince the olives and garlic into a paste and mix with the lemon juice or vinegar, and the sugar, salt, and pepper. (I actually do all of this in a little food processor, and I don't add pepper because radicchio leaves are so peppery.)

Toss the radicchio with the dressing, and divide amongst the serving bowls. Top with Parmesan if you like. (I actually find that it's not necessary.)


Endive Salad with Walnuts
(By Molly Watson, of The Dinner Files)
Makes 4-6 Servings
  • 4 heads Belgian endive
  • 1/2 cup chopped walnuts
  • 3 tablespoons walnut oil
  • 1 tablespoon lemon juice, cider vinegar, or white vinegar
  • 1 teaspoon whole grain mustard
  • 1 teaspoon Dijon mustard
  • Salt and pepper to taste

Toast the walnuts in a toaster oven or a 350 degree oven. Trim the ends of the endives, and chop or slice them into bite-sized pieces.

In a large bowl, whisk together the oil, lemon juice or vinegar, and the mustards. Add salt and pepper to taste (I actually find that pepper is not necessary.) Add the endives and toss until thoroughly coated. Divide the salad into serving bowls and top with the toasted walnuts.


Sunday, February 6, 2011

Spinach Feta Fritters


As you may know, I have a well-documented fritter problem. If it's a vegetable and I like it, I'll probably try to turn it in to a fritter. Therefore, one of my all-time favorite flavor combinations--spinach, feta, pine nuts, and tomato--was just begging to be turned into patty form. Here's the result; I hope you like it.


Spinach Feta Fritters

  • 2 bunches fresh spinach (a little less than 2 lbs)
  • 2 eggs
  • rounded 1/4 cup feta cheese
  • 1/2 cup tomato sauce
  • Juice of 1/4 lemon
  • 1/4 cup pine nuts
  • 1/2 cup flour
  • 1 teaspoon Kosher salt, plus more to taste
  • Freshly ground black pepper
  • 2-3 tablespoons canola oil

Set a very large pot of water on the stove to boil. In the meantime, fill a large bowl with water. Cut the stems off the spinach bunches, and place the leaves in the bowl of water. Swish them around until all the dirt is removed, and place the leaves in a colander.

While you'res still waiting for the water to boil, toast the pine nuts in a toaster oven or a 350 degree oven. When the water boils, add the spinach and cook until tender but still bright green, about 2 minutes. Remove the spinach to the colander. There's really no need for an ice bath.

When the spinach has cooled, squeeze the water out of it. Don't drive yourself crazy, though--it doesn't have to be completely dry. Chop the spinach as fine as you can, again without driving yourself crazy.

In a large bowl, combine the eggs, feta, tomato sauce, lemon juice, pine nuts, flour, salt, pepper, and spinach, and mix well. In a large non-stick skillet, heat 1 tablespoon oil until shimmering. Add enough spinach mixture to the pan to make a patty that's about 3 inches in diameter.

Cook until the top starts to look a little firm, and the bottom edges look a little dried out. Flip--the top should be nicely browned. Cook the other side until golden brown, just a little longer (the second side will cook faster than the first).

Taste this fritter and adjust for seasoning--add more salt, pepper, and lemon juice as necessary. Also, if the batter is too thin, add a little bit of flour. Once the seasoning is correct, cook the rest of the batter in the same manner, adding more oil to the pan as necessary.

Thursday, October 14, 2010

Gravlax


Fall means salmon, and in my mind, salmon means Gravlax.

Gravlax is another one of those appetizers or hors d'oeuvres that require almost no effort, but will get you a lot of accolades. This is particularly convenient when you have a big party to prep for because you'll look like a super-star, but not be all stressed out. Or maybe you will be stressed out, but not because of your stellar hors d'oeuvres.

To make gravlax, you basically take a hunk of salmon, cover it with some spices, and throw it in the fridge for a few days. When it emerges, you have a silken, flavorful delicacy.
 
Gravlax is a lot like cold-smoked salmon, and it plays well with the same ingredients. 'Everything' bagels with some cream cheese would make a lovely brunch spread, but my favorite way to enjoy this fishy goodness is with some pumpernickel toasts, minced red onions, capers, and a mustard cream sauce.

If you make this, do not be tempted to skip the sauce--it takes only a few minutes to throw together, and, as my family says, it 'makes' the dish. This salmon makes an appearance at almost all of our cold-weather family occasions, and it's become a favorite. Perhaps it can become a favorite in your family, as well. If you make it, let me know what you think.


Gravlax
(Adapted from Saveur)
  • 1 tbsp. white peppercorns
  • 1/2 tbsp. fennel seeds
  • 1/2 tbsp. caraway seeds
  • 1⁄3 cup kosher salt
  • 4 tablespoons sugar
  • 1-lb. center-cut, skin-on salmon filet
  • 2 tbsp. dijon mustard
  • 1 tbsp. fresh lemon juice
  • 1 tbsp. red wine vinegar
  • 1 tsp. sugar
  • 2 tbsp. extra-virgin olive oil
  • 1 tbsp. heavy cream
To serve:
  • 1 loaf thinly sliced pumpernickel bread, pieces cut into diamonds
  • 1 small red onion, finely diced
  • 4 tablespoons capers, rinsed
In a spice grinder or small food processor, pulse peppercorns, fennel seeds, and caraway seeds until coarsely ground; combine with salt and sugar. Stretch plastic wrap over a plate; sprinkle with half the salt mixture. Place salmon fillet on top, flesh side up. Cover with remaining salt mixture.
 
Fold plastic wrap ends around salmon; wrap tightly with 2 more layers of plastic wrap. Refrigerate the fish on a plate for 48–72 hours, turning the package every 12 hours and using your fingers to redistribute the herb-and-spice-infused brine that accumulates as the salt pulls moisture from the salmon. The gravlax should be firm to the touch at the thickest part when fully cured.

Unwrap salmon, discarding the spices. Rinse the filet under cold running water and pat dry with paper towels.

For the sauce, whisk together dijon mustard, lemon juice, vinegar, and sugar in a medium bowl. While whisking, slowly drizzle in olive oil until smooth. Mix in the cream and taste for seasoning.

Place gravlax skin side down on a board. With a long, narrow-bladed knife (use a granton slicer if you have one; the divots along the blade make for smoother, more uniform slices), slice gravlax against grain, on the diagonal, into thin pieces. Serve with mustard sauce, minced red onion, capers, and pumpernickel toasts. Refrigerate any remaining gravlax, wrapped in plastic wrap, for up to 2 weeks.

Wednesday, October 13, 2010

Chicken Liver Pate with a Fig and Red Wine Compote


I've mentioned before that a lot of people in my family are big fans of chicken livers; when I brought a Daring Cook's pate recipe to a party, people claimed to love it even though it looked and tasted a bit like dog food. So when another family party came around, I decided that I wanted to attempt a chicken liver pate reprisal.

Some internet searching turned up an Epicurious recipe, which, once modified, produced almost exactly what I was looking for. This pate is smooth and sophisticated, not to mention delicious. Plus, it's super-easy to make, but if you don't tell people about that little fact, they'll probably think that you spent a few hours on it. You can even make it way ahead of time, freeze it, and then defrost it for impromptu dinner parties.


Chicken Liver Pate with a Fig and Red Wine Compote
(Adapted from Epicurious)
  • Nonstick vegetable oil spray
  • 1 pound chicken livers, trimmed
  • 1 cup canned low-salt chicken broth
  • 1 small onion, thinly sliced
  • 1/2 cup (1 stick) unsalted butter, room temperature
  • 3 tablespoons Cognac
  • 1 1/4 teaspoons salt
  • 1 teaspoon thyme leaves
  • 2 small pinches allspice
  • Freshly ground black pepper
  • 1 cup dry red wine
  • 3/4 cup dried black Mission figs, cut in half
  • 1 large sprig fresh rosemary
  • Optional: 1/2 cup chopped toasted walnuts or pecans
  • 1 French-bread baguette, sliced, toasted if you like
Spray a 3-cup soufflé dish, a terrine, or 4 6-ounce ramekins (my preference) with vegetable oil spray. Line the dish or dishes with plastic wrap; spray plastic. Combine chicken livers, broth and onion in medium saucepan. Bring to boil, cover and simmer until livers are cooked through, stirring occasionally, about 12 minutes.

While the chicken livers simmer, bring wine, figs, rosemary, and 3 grinds of fresh black pepper to simmer in small saucepan. Simmer until figs soften, about 15 minutes. Remove the figs with a slotted spoon and set aside. Reduce the wine until it's a thick syrup, about 5 minutes (you'll probably have a tablespoon or two). Remove and discard the rosemary.

In a blender or in the bowl of a small food processor, puree the figs into a paste. Spoon the syrup into the bottom of the prepared dish or dishes, and spoon the figs over top.

Drain cooking liquid; transfer chicken livers and onion to food processor. Add butter, Cognac, salt, thyme, allspice, and 4 grinds of black pepper to processor. Puree until smooth. Spoon on top of the fig puree, and fold the plastic wrap down over the surface, or cover with more plastic wrap if there is not enough to fold over. Refrigerate at least 4 hours, preferably overnight.

Unmold pâté onto platter. If you're using the nuts, press them onto sides of pâté. Serve with toasts or bread.

Monday, August 23, 2010

Salt, Pepper and Sesame Crackers


I have a cracker problem. Unlike the zucchini problem and the corn problem, the cracker problem is pan-seasonal, and it knows no limits. Specifically, I really really love Kashi's crackers (and they're not paying me to say that).

According to the normal laws of food addiction, after pounding them for years, I should be vomitously sick of Kashi crackers. But I'm not. I think that they put crack in them or something, like along the lines of blueberry bar and grill bread crack.


You know how chefs play the last meal game? As in, if you knew that this was to be your last meal on Earth, what would you eat? Well, contrary to expectations, a lot of chefs do not choose foie gras, truffles, or caviar--they choose fried chicken, peanut butter and jelly, cheese burgers, macaroni and cheese, or a nice steak...

Well, my last meal would have to include crackers; heck, it could maybe even be crackers, as a vehicle for some sort of fattiness, whether it be cheese, pesto, or romesco. Therefore, I figured that it's probably time to move beyond the Kashi. Shouldn't I have my own, homemade cracker to obsess over?

That's where these crackers come in. There's nothing especially exceptional about them, but they seemed like a good place to start because they're very approachable--all you do is mix some simple stuff together, roll out the resulting dough, and bake it. 

The original recipe came from Chocolate and Zucchini, and I altered it a bit based on the ingredients I had on hand. You may also notice that my crackers are way thicker than the ones on the Chocolate and Zucchini site. I, being the genius that I am, thought that I would prefer a thicker cracker (like the Kashi ones), as opposed to the light, thin, shattery ones from the original recipe. 

Well, my crackers were pretty yummy, but they're a bit dry and tough. So it's probably best to keep these on the thin side, thus the pasta roller method suggested below. But despite their toughness, Nick still described them as being 'pretty good.' That's saying a lot from someone who does not hear the Cracker Siren Call as I do. The Mister, of course, loves them, but he gets so excited that he looks like he's having a seizure any time there's any cracker in his general vicinity, so that's not saying too much.

If you do feel the need to modify though, I would suggest adding some fresh herbs like some rosemary or sage, or some spices, like anything from cayenne to cumin seeds to cardamom.


Salt, Pepper, and Sesame Crackers
(Adapted from Zucchini and Chocolate)


  • 150 grams (5 1/3 ounces) all-purpose flour 
  • 150 grams (5 1/3 ounces) white whole wheat or whole wheat flour (or you can use all regular flour)
  • 20 grams (3 tablespoons) toasted sesame seeds
  • 9 grams (1 1/2 teaspoons) fine sea salt
  • 3 tablespoons olive oil
  • 120 ml (1/2 cup) water


Place the flours, seeds and salt in a mixing bowl. Add the olive oil and stir it in with a fork. Add the water and mix it in.

When the water is absorbed, turn the mixture out on a clean work surface and knead the dough gently to gather into a smooth ball. Add a touch more water if the dough feels too dry to come together, but the consistency you're shooting for is smooth, not at all sticky or tacky.

Divide the dough into 3 pieces of (roughly) equal size, and cover with a kitchen towel.

Preheat the oven to 200°C (400°F) and prepare two baking sheets lined with parchment paper or silicon baking mats -- this is so you can bake two batches of crackers at a time, but if you only have one baking sheet, that's fine, too. If you have a rectangular or square bread stone, place it in the oven as it preheats; you'll need only one baking sheet in addition to the stone then.

Take one piece of dough (keep the others covered to prevent them from drying out) and flatten it into an oval disk between the palms of your hands. Set a pasta roller on the widest setting, and slip the disk of dough in the roller to thin it out. Fold both ends of the dough back over each other like a business letter and slip the dough in again. Repeat 3 or 4 times until the dough feels supple; you are essentially kneading the dough in the process. If it gets sticky at any point, dust it with a little flour.

Switch the pasta roller to the next (= narrower) setting and slip the dough in (just once this time) to thin it out. Repeat with the subsequent settings until you reach setting #5, and get a thin (I also think that 4 might work), long rectangularish sheet of dough. Place it on one of the prepared baking sheets, or a flour-dusted peel if you're using a bread stone.

(I think that if you don't have a pasta roller, you can probably roll these out by hand. Just make sure that the dough is relatively even, so that you don't end up with burnt spots interspersed with doughy spots.)

Repeat with more pieces of dough until there is no room left on your baking sheets. Using a dough cutter, a pastry wheel or just a knife, score the sheets of dough into square or triangular pieces so they'll be easier to break off.

Insert the baking sheets into the oven (or, if you're using a pizza stone, slide the dough in using the pizza peel) and bake for 7 to 10 minutes, or until golden to golden brown.

Transfer to a cooling rack, and repeat with the remaining pieces of dough.
The crackers will keep for a few weeks in an airtight container.


Friday, August 6, 2010

Tomato Tart


A tomato tart had been on the extended to-do list for quite a while now. It's a common dish in both French and Italian cuisine, and it's great as an appetizer, a snack, part of a light dinner, or as a side.

We had been little piggies all week, so we decided that we needed a light, summery dinner. Our old stand-by Golden Corn Chowder, paired with a tomato tart, fit the bill perfectly. Plus, like I mentioned before, I like to OD on highly seasonal ingredients, and I figured this would help.

We used a very mild goat cheese, but you could use any cheese that melts well, such as comte, haloumi, or even mozzarella.


Tomato Tart

Crust
  • 2 tablespoons almonds with skins, toasted and cooled
  • 3/4 cup all-purpose flour
  • Pinch of fine sea salt
  • 1/2 stick cold unsalted butter, cut into 1/2-inch cubes
  • 1 large egg yolk
  • 3 1/2 tablespoons fruity olive oil (preferably French)
  • About a tablespoon Dijon mustard (optional)

Filling
  • 4 ripe tomatoes, sliced about 1/4 inch thick
  • 1 1/2 tablespoons freshly chopped herbs (We used summer savory, thyme, and oregano. You could also use marjoram, tarragon, basil, or anything else you feel like throwing in there.)
  • 3 ounces mild goat cheese
  • 1 tablespoon olive oil
  • Salt
  • Freshly ground black pepper

Preheat oven to 425°F with rack in middle.

Pulse almonds with flour, sugar, and sea salt to a fine powder in a food processor. Add butter and pulse until mixture resembles coarse meal with some small (roughly pea-size) butter lumps.

Add yolk and oil and pulse until just incorporated and a very soft dough has formed. Form into a disk, wrap in plastic wrap, and chill until firm, about 30 minutes.

Spread dough evenly over bottom and up side of pan.
Bake shell until golden brown all over, about 13 minutes. Transfer to a rack to cool a bit.

When the tart has cooled enough that it's not very hot to the touch, arrange the tomatoes in a spiral. (Optional: first brush the crust with a thin coating of Dijon mustard.) Sprinkle half of the fresh herbs over the tomatoes, and spread chunks of the goat cheese around as well. Sprinkle the rest of the herbs over the tart, and season with salt and pepper.

Drizzle with olive oil, and bake in the center of the oven for about 40 minutes, until the tart dough is golden brown, the tomatoes are tender, and the cheese is browned.

Optional-drizzle with balsamic vinegar to serve.

This tart is good served either warm or at room temperature, but it's best the day it's made.


Corn Fritters, Home-Ground Burgers, Caramelized Onions


It's summer, so all I want is corn, corn, corn. Well, not really. But with highly seasonal ingredients, I like to eat copious amounts of them--to the point where I've totally OD'd and don't even want to think about said ingredient any more.
You see, that way, I don't mind that whatever I'm binging on is highly seasonal and I won't be eating it again for almost a year. No problem! I don't want to anyway! No pining for tomatoes with basil in the middle of January. Nope, I'm okay with some Brussels sprouts, sweet potatoes, and winter squash.

So how was I to eat this corn? We had already made our Golden Corn Chowder, and I wasn't in the mood to make the Creamless Creamed Corn (coming soon). In fact, I wanted something all-new, something all made-up.
As you may know, I have a zucchini fritter problem. I'm almost successfully rehabilitated, so I figure it's time for a corn fritter addiction. Bring it on.


Corn Fritters

  • 6 ears of corn, the kernels cut off
  • 1/2 tablespoon salt
  • 1/4 teaspoon cayenne
  • 1/2 teaspoon cumin
  • 1/4 teaspoon white pepper
  • 2 eggs
  • 1/4 cup flour
  • 1/4 cup sour cream
  • 1 jalapeno, finely diced
  • 1 red bell pepper, finely diced
  • 2 scallions, light and dark green parts, finely sliced
  • Hot sauce (optional)
Place the corn kernels in a large bowl. Add the salt, pepper, and cayenne, and cumin, and taste for seasoning. Add the eggs, flour, and sour cream, and mix to incorporate. Add the jalapeno, pepper and scallions and mix again.

In a large skillet, heat 1-2 tablespoons canola oil over medium heat. When the oil is shimmering, drop the batter into the skillet to make fritters that are about 4 inches in diameter. Cook until the very outer edges start to look dry; some bubbles may appear. This will likely take about 6 minutes, and when flipped, the fritter should appear golden brown.
Cook on the other side until light golden, about 3 minutes.
I like to serve them with hot sauce and sour cream.

 We enjoyed these with home-ground burgers, which were awesome. As you probably know, store-bought ground meat should not be served medium-rare or medium because all the bacteria that was on the outside is now on the inside where it's multiplying exponentially. Therefore, unless the ground meat product is cooked all the way through, you may get some dangerous nastiness in your meal.
However, if you buy a big hunk of meat and grind it at home, using sanitary technique, of course, then you can eat the ground meat product even if it's cooked to medium-rare or medium.
For this reason, I invested in the inexpensive grinder for the Kitchenaid stand mixer. I'm not a fan of dried out, killed burgers, and it's not a good idea to order 'undercooked' burgers when out in a restaurant. So I figured I'll do it at home.
In fact, this batch was accidentally cooked to medium-well, and they were still better than the average burger, most likely because we used quality meat and treated it right.
So if you decide to get a grinder attachment, here's how to make some yummy burgers:


Home-Ground Burgers

  • 1/2 pounds chuck
  • Salt
  • Freshly ground black pepper
Cut the chuck into 1-inch pieces. Season the meat with salt and freshly ground pepper. Place on a parchment-lined sheet pan, and place in the freezer for about 30 minutes. When the meat is firm to the touch but not frozen through, pass it through the grinder.

Gently form the meat into patties. You don't want to over handle the meat, as it will make the burgers less tender. Grill to the desired doneness. Serve with your favorite fixin's.

We served ours with the standard lettuce, tomato, and raw onion. We also had bacon, because we can. Aaaaannd, we had Nick's awesome caramelized onions, otherwise known as 'tadpoles.' Here's how to make them:

Nick's Awesome Caramelized Onions
(a.k.a. "Tadpoles")

Cut an onion or two into thin slices. I read somewhere that if you go along the lines of the onion, then you break fewer cells, so you get less sulpher-y tasting slices. I don't know if that's true, but that's what we do.

In a small pan, melt a tablespoon of butter. When the foaming has subsided, add the onions. In a few minutes, add 1/2 teaspoon salt and a teaspoon of sugar. Cook the onions over very low heat for at least 40 minutes, and up to an hour or two. Stir occasionally, and add a little bit more butter if the onions start to dry out. The onions are done when they are a deep golden color, and they're so tender they're almost melting. Or until you're just sick of cooking them.



Tuesday, August 3, 2010

Corn and Toasted Cumin Salsa


Sometimes I like a change from the standard tomato salsas, but I'm not a big fan of the usual alternatives that contain things like mango. This salsa, though, is perfect.

Fresh corn with some toasty cumin and spicy jalapeño makes a delightful summer salsa. I made some to take to our Fourth of July picnic, and Nick ate almost the whole thing, and I easily polished off the rest.

This is pretty easy to make, and it keeps pretty well in the fridge for a couple days. If you make this corn salsa, your friends will be impressed that you came up such a yummy sumer dip.

Blueberry bars, eaten during the fire works, were the perfect finale to our picnic-y feast. If you haven't tried them already, you really should. Or maybe you shouldn't. Like one of our friends said, "They're like crack." Seriously.


Corn and Toasted Cumin Salsa

  • 2 cups corn (from 3 to 4 ears)
  • 1/2 lb yellow tomato (1 large), chopped
  • 1 garlic clove, chopped
  • 1 to 2 teaspoons chopped fresh jalapeño chile, including seeds
  • 1 tablespoon fresh lime juice
  • 1 teaspoon cumin seeds, toasted
  • 1/2 teaspoon salt
  • 1/4 cup scallions, finely chopped

Cook corn in a dry12-inch heavy skillet over moderate heat, stirring frequently, until golden brown, about 10 minutes. You can use a tiny bit of oil, if you like--it will help prevent little corn bits from melding with your skillet. Transfer to a bowl and cool 5 minutes.

Purée tomato, garlic, and jalapeño with lime juice, cumin, and salt in a blender until smooth, then stir into corn along with scallions. Taste for seasoning and add more salt or lime juice if needed. Sometimes it also needs a pinch of cayenne and/or black pepper.

Friday, July 30, 2010

Guacamole


There are times when nothing but some fresh, creamy guacamole will do. I usually start craving it a couple weeks before I actually make it, but I don't make it right away because, for various reasons, I dismiss the craving as inconvenient. There comes a time though, when I just have to give in and make the green goodness, but I try to do it when there will be other people around.

Why? Because I can eat a massive amount of this stuff all by myself. I've been known to make it as an appetizer to go with a margarita, then become so enamored of the dip and its attendant chips (not to mention the margarita) that I forget to make dinner altogether.

Therefore, this batch was made when a fellow guacamole-lover was coming to dinner. We had to put it to the side so that we didn't spoil our dinners, because it was just too satisfying to stop eating. I love guacamole in the summertime, especially with some grilled meat to follow the chips-and-dip binge.


Guacamole

  • 2 avocados
  • Juice of half a lime
  • 1/2 teaspoon salt
  • Pinch of white pepper
  • Tiny pinch of freshly ground black pepper
  • Tiny pinch cayenne
  • 3 tablespoons finely diced onion
  • 1 Finely diced jalapeno
  • Half of a tomato, finely diced
Place the avocado and other ingredients through the cayenne into a bowl and mash until it's mostly smooth, but has a few chunks left. (Or make it very chunky of completely smooth-whatever you prefer). Taste for seasoning, and add any of the prior ingredients if needed. Remember, though, that the jalapeno will add heat. When seasoning is to your taste, stir in the rest of the ingredients. Grab some chips and enjoy.


(Another summertime favorite--toasted whole grain bread with tomatoes, salt, pepper, and mayonnaise. Mmmmm.)


Monday, June 14, 2010

Daring Cook's Challenge: Pate and Baguettes


Blog-checking lines: Our hostesses this month, Evelyne of Cheap Ethnic Eatz, and Valerie of a The Chocolate Bunny, chose delicious pate with freshly baked bread as their June Daring Cook’s challenge! They’ve provided us with 4 different pate recipes to choose from and are allowing us to go wild with our homemade bread choice.
 
I have to admit that I wasn't too crazy about the prospect of making this Daring Cook's challenge. Don't get me wrong--I love liver, as I discussed in a previous post. It's just that I knew Nick wouldn't want to eat it and there was no way I was going to be able to eat a chicken liver terrine the size of a whole loaf of bread.
Luckily, the perfect opportunity to dispose of said loaf came along in the form of a family party. As I've said before, my family loves liver, so they were quite willing to dispatch a whole lot of liveriness, no matter that it looked and smelled like dog food. No, seriously. It did.

Happily, this little experiment tasted better than it smelled. I might even consider making it again, particularly because the leftovers (and I promise you that there will be leftovers) can be divided into smaller portions, frozen, and defrosted at any time. I might even take a less sucky picture of it.


So what would I not do next time? Forget the Cognac. As I was tasting for seasoning, I kept thinking "Hmmm...Something's missing, but I can't quite put my finger on what it might be." It wasn't until it had been taken out of the oven to cool that I realized my error. I think that the Cognac would have perfectly provided that missing Something, but that's just too bad.


You know what else I wouldn't do? Taste for seasoning and decide that it needs a bit more cloves. The finished product tasted overwhelmingly of cloves, although nobody else seemed to mind. Note to self: the seasonings are perfect. Do not mess with them.


Part of the challenge was to make baguettes to serve as the plate-to-mouth vehicle, although my brother dispensed with such niceties. I of course decided to make Jim Lahey's recipe, which I've previously discussed here, and a post with the recipe is in the works.


The result? Curiously underwhelming. Next time I'll probably stick with either his standard recipe or his ciabatta recipe. Nonetheless, like I've said before, this bread will still impress your friends and family and buy you some love.


Chicken Liver Terrine


Yields one 25 by 12,5 cm (10 by 5 inch) terrine or loaf pan
-1 tablespoon duck fat, or butter
-2 onions, coarsely chopped
-300g (11 oz) chicken livers, trimmed
-3 tablespoon brandy, or any other liqueur
-100g (3 1/2 oz, 1/2 cup) smoked bacon, diced
-300g (11 oz) boneless pork belly, minced
-200g (7 oz) ground pork-2 shallots, chopped

-1 teaspoon quatre-épices (or 1/4tsp each of ground pepper, cloves, nutmeg and ginger is close enough)
-2 eggs
-200 ml (7 fl oz, 3/4 cup + 2 tbsp) heavy cream
-2 fresh thyme sprigs, chopped
-Salt and pepper

Preheat oven to 400 degrees F.
Melt the fat or butter in a heavy frying pan over low heat. Add the onions and cook, stirring occasionally, for 5 minutes, until softened. Add the chicken livers and cook, stirring frequently, for about 5 minutes, until browned but still slightly pink on the inside.
Remove the pan from heat. Pour in the brandy, light a match and carefully ignite the alcohol to flambé. Wait for the flames to go out on their own, carefully tilting the pan to ensure even flavoring. When the mixture has cooled slightly, transfer to a food processor and cop until finely minced.
Put the minced pork belly and ground pork in the food processor, then add the onion-liver mixture and the chopped shallots, and pulse until you obtain a homogenous mixture – make sure not to reduce it to a slurry.
Transfer to a bowl, and gradually stir in the chopped bacon, quatre-épices, cream, eggs, and thyme. Season with salt and pepper, and mix well. Spoon the mixture into a terrine or loaf pan, and cover with the terrine lid or with aluminum foil.
Prepare a water bath: place the loaf pan in a larger, deep ovenproof dish (such as a brownie pan or a baking dish). Bring some water to a simmer and carefully pour it in the larger dish. The water should reach approximately halfway up the loaf pan.
Put the water bath and the loaf pan in the oven, and bake for 2 hours. Uncover and bake for another 30 minutes. The terrine should be cooked through, and you should be able to slice into it with a knife and leave a mark, but it shouldn’t be too dry. Refrigerate, as this pâté needs to be served cold. Unmold onto a serving platter, cut into slices, and serve with bread.
NOTE: This pâté freezes well. Divide it into manageable portions, wrap tightly in plastic film, put in a freezer Ziploc bag, and freeze. Defrost overnight in the fridge before eating.


By the way--this guy was for another meal, but I'm wondering if maybe some people out there have some answers for me.
I seasoned him with some salt and pepper and stuffed him with some herbs (summer savory, oregano, and epazote) and lemon, brushed him with some oil, and attempted to grill him.


The meat was properly cooked and ultimately edible, but my problem was the skin sticking to the grill grates. I oiled the fish, which was apparently not the solution. Does anyone know how to prevent this? My other problem is a recurring one--the fish tasted a bit like propane. I don't have this problem with meats, just fish. Again--why? Help!