Thursday, December 16, 2010

Salted Caramel Buttercream Frosting


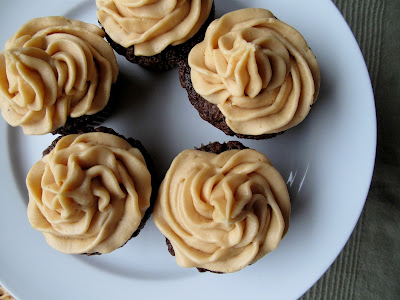
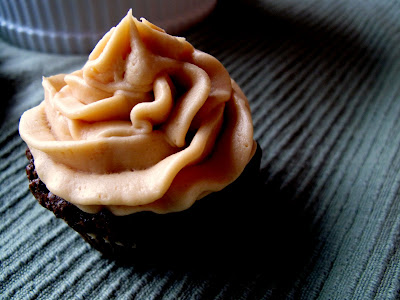
Those are some manly-looking cupcakes, aren't they? Plus, they're far more interesting than the usual chocolate cake with chocolate or vanilla icing--the icing is a salted caramel buttercream. I made these for my brother's birthday, and although he hasn't had much of a sweet tooth since the age of 7, he ate two of them and took a few more home. That's high praise.

Salted Caramel Buttercream
(From Cupcakeblog.com)
  • 2 sticks butter
  • 8 ounces or 1 package of Philly cream cheese
  • 5 to 6 cups powdered sugar
  • 1 cup salted caramel (Below)
Bring butter to room temperature by letting it sit out for 1 or 2 hours. 
Sift 3 cups of powdered sugar into the butter/cream cheese mixture and beat to combine. Add 1 cup of the salted caramel and beat to combine.
Sift 2-3 cups of powder sugar, in 1 cup increments and beating between each, until you arrive at the thickness and sweetness you desire.

Salted Caramel
(From Smitten Kitchen)
  • 1 cup sugar
  • 3 ounces (6 tablespoons) salted butter, the better you can get, the better it will taste
  • 1/2 cup plus two tablespoons heavy cream, at room temperature
  • If you only have unsalted butter, a pinch of salt.
Melt the sugar over medium to moderately high heat in a larger pot than you think you’ll need–at least three quarts (I used six), whisking or stirring the sugar as it melts to ensure it heats evenly. Cook the liquefied sugar to a nice, dark copper color. Add the butter all at once and stir it in. Before turning off the stove pour in the heavy cream (and salt if you're adding it) and turn off the heat (the sauce will foam up quite a bit when you add it; this is why you want the larger pot.), whisking it until you get a smooth sauce.


Use it right away or pour it into a jar and store it in the fridge for up to two weeks. When you take it out, the caramel will likely have thickened a bit but a few seconds in the microwave brings it right back to pouring consistency. We microwaved it covered, in 10 second increments.

Wednesday, December 15, 2010

Molasses Crinkles


If you have time to make only one batch of cookies this year, I would highly recommend that it be these molasses crinkles. Forget chocolate chip and sugar cookies, these cookies are the essence of Christmas. Like eggnog and bourbon balls, these cookies will wrap you in a holiday glow, and the warm spiciness of the cinnamon, cloves, ginger and allspice will make your house feel like the best place on Earth. Add a roaring fire and a fragrant, glowing Christmas tree, and you've got holiday magic.

These chewy, sophisticated cookies are so awesome that the first year Nick brought them to work, people came within a hair of getting in a fistfight over them. The next year, they didn't come to blows, but they resorted to stealing the unattended cookies and hiding them in their desks. That's why I always make at least a double batch these days--I wouldn't want anyone to get hurt.


My coworkers are not quite so dramatic, but when I mention that I've brought in a batch, their eyes light up and they ask, Those cookies from last year? Those are awesome! A lot of us can barely remember yesterday, so for these cookies to be remembered a year later is really saying something.

If that's not enough to convince you to make these, how about the fact that they're fun and easy to make? And, after you've made these once, you'll have the ingredients on hand for future batches. I'm sure you can see why they're a holiday staple in our house.


Molasses Crinkles
(From Epicurious)
  • 2 1/4 cups all-purpose flour
  • 2 teaspoons baking soda
  • 1 teaspoon ground cinnamon
  • 3/4 teaspoon ground ginger
  • 1/2 teaspoon ground allspice
  • 1/2 teaspoon ground cloves
  • 1/2 teaspoon salt
  • 1/2 cup vegetable shortening at room temperature
  • 1/2 stick (1/4 cup) unsalted butter, softened
  • 1 cup packed dark brown sugar
  • 1 large egg
  • 1/2 cup molasses (not robust or blackstrap)
  • About 1/3 cup sanding or granulated sugar* (I used Sugar in the Raw) for tops of cookies

Whisk together flour, baking soda, cinnamon, ginger, allspice, cloves, and salt in a bowl until combined.

 
Beat together shortening, butter, and brown sugar in a large bowl with an electric mixer at medium-high speed until pale and fluffy, about 3 minutes in a stand mixer (preferably fitted with paddle attachment) or 6 minutes with a handheld. Add egg and molasses, beating until combined. Reduce speed to low, then mix in flour mixture until combined.

 
Put oven racks in upper and lower thirds of oven and preheat oven to 350°F.

 
Roll 1 heaping teaspoon of dough into a 1-inch ball with wet hands, then dip 1 end of ball in sanding sugar. Make more cookies in same manner, arranging them, sugared side up, 2 inches apart on ungreased baking sheets.

 
Bake cookies for 8 minutes, then cool on sheets 1 minute. The original recipe calls for the cookies to be baked for 10 to 12 minutes, but I found, as did a lot of the reviewers on Epicurious, that 10 minutes is too long. You want to take the cookies out when they still look almost raw--they should just be developing cracks on the surface, and they should not have taken on any color. The edges will have started to set, but the middles will still be puffy and almost wobbly. You have to trust me on this one--if you overcook these cookies, they're still tasty, but they end up being more like gingerbread and that certain something is gone. Don't worry if the cookies don't look as dark as they do in the pictures--they get darker and more crinkly as they cool.

Transfer to racks to cool completely. Make more cookies with remaining dough on cooled baking sheets.


Tuesday, December 14, 2010

Eggs Benedict


When we were planning a trip to California earlier this year, my Dad suggested that we go to a particular restaurant and get eggs Benedict. "I don't like eggs Benedict," I replied. So when my crappy omelette arrived, I tried my brother's eggs Benedict, and of course, I loved it. Isn't it funny how parents are usually right?

So I've decided that I like eggs Benedict, and on the morning this challenge was announced, I had actually been lying in bed craving them.'But I would never want to make them,' I thought. So I was utterly unsurprised when I got out of bed, opened the webpage announcing the challenge, and saw that it was eggs Benedict.

Because my Dad (obviously) likes eggs Benedict, I got over my multiple misgivings and made this dish for him, at which point I decided that I'll likely never make it again. I've made a lot of complicated things in my time, and I've got to say that this eggs Benedict was one of the most difficult things I've made in a while. Its multiple components had me frazzled, as they all require good technique and good timing.

That's exactly why I do the Daring Cooks, though--to force me to make things that intimidate me. And two of the most intimidating aspects of this challenge are skills that every cook should be at least a little bit familiar with--poaching eggs and making a Mother sauce (in this case, Hollandaise). And who knows, maybe I'll make this again some day and find that it's a lot easier the second time around, as is often the case in cooking.

If you would like to make this classic brunch item at home, I can suggest two things that can make eggs Benedict more approachable: The eggs can be poached up to a day ahead of time and kept in a cold water bath. When you're ready to use them, throw them into some gently simmering water until they're just warmed through. Also, the Hollandaise can be made a little bit ahead of time and kept warm. I filled a travel mug with boiling water, let it sit for a few minutes, dumped out the water, and poured in the Hollandaise. It stayed warm that way for half an hour, and it probably would have been okay for an hour.


The Daring Cooks had some other helpful tips:
  • Make sure to use the freshest eggs possible. Farm-fresh eggs will make for the best poached eggs. If you use old eggs, you'll have a harder time with the whites spreading out all over the place when you place the egg in the water.
  • Adding a bit of vinegar or acidic agent to your water will help stabilize the eggs and cook the whites faster, and keeping you water just below the boiling point (about 190 degrees) will help keep the fragile eggs from all the boiling bubble action rupturing the eggs. Also make sure you salt the poaching water well.
  • The other main key to success is to crack your eggs into a small bowl first, taking care not to break the yolk. Then it becomes easy to gently slide the entire egg into the water for the poaching process. Some people also suggest swirling the poaching liquid into a vortex before sliding the egg in, in order to help keep the egg whites together. I've found it works fine whether or not you do this step.
  • A poached egg is done when the whites are fully cooked and the yolk has just started to solidify but is still tunny when you cut it open--about 3 minutes. It's okay to go a little longer depending on your desired firmness.
Eggs Benedict
Serves 4 
  • 8 eggs (size is your choice)
  • 4 English muffins
  • 8 slices of Canadian bacon (Or plain bacon if you prefer. I actually used pancetta, which I thought worked perfectly.)
  • Chives, for garnish (Optional)
  • Splash of vinegar (for poaching)
For the Hollandaise (makes 1.5 cups):

  • 3 large egg yolks
  • 1 tsp. water
  • ¼ tsp. sugar
  • 12 Tbl. (6 oz.) unsalted butter, chilled and cut in small pieces 
  • ½ tsp.kosher salt
  • 2 tsp. freshly squeezed lemon juice
  • Pinch cayenne pepper (optional)
Fill a saucepan with about an inch of water and bring to a simmer. Cut the chilled butter into small pieces and set aside. In a metal mixing bowl, whisk egg yolks and 1 tsp. water in a mixing bowl large enough to sit on the saucepan without touching the water (or in top portion of a double boiler). Whisk for 1–2 minutes, until egg yolks lighten. Add the sugar and whisk 30 seconds more.

Place bowl on saucepan over simmering water and whisk steadily 3–5 minutes until the yolks thicken to coat the back of a spoon. Remove from heat (but let the water continue to simmer) and whisk in the butter, 1 piece at a time. Move the bowl to the pan again as needed to melt the butter, making sure to whisk constantly.

Once all the butter is incorporated, remove from heat and whisk in the salt, lemon juice, and cayenne pepper (if using). Taste and add more salt, lemon juice, or cayenne as needed. Keep the Hollandaise warm while you poach your eggs in a thermos, carafe, or bowl that you’ve preheated with warm water.

Add enough water to your pan so that you have 2–3 inches of water and bring back to a simmer. Add salt and a splash of vinegar (any kind will do). Crack eggs directly into the very gently simmering water (or crack first into a bowl and gently drop into the water), making sure there's space between them. Cook for 3 minutes for a viscous but still runny yolk.

While waiting for the eggs, quickly fry the bacon and toast your English muffins. Top each half of English muffin with a piece of bacon. Remove the eggs with a slotted spoon, draining well, and place on top of the bacon. Top with Hollandaise and chopped chives, and enjoy!


Monday, December 13, 2010

Bourbon Cranberry Sauce


For years and years, I searched for the perfect cranberry sauce. I tried adding allspice, cloves, Zinfandel, and orange zest. I tried simmering, boiling, and marinating the cranberries. And then a couple years ago, I stumbled upon the ultimate cranberry sauce, courtesy of Epicurious.


The secret is bourbon, but don't let that scare you off. I make things like bourbon balls for the holidays because I have some bourbon lovers in the family, but I personally can't really handle the spirit. In cranberry sauce, though, it's magical--it adds just enough punch to play off the tartness of the cranberries, and it brings out all of the fruit's complexity. Somehow, it also adds a hint of an orange flavor, and it tones down the mouth-puckering sweetness of the sauce.

And the best part may be the fact that you don't have to watch a pot on the stove--you just throw 3 ingredients together in a baking dish and throw the whole thing in the oven for an hour; it's almost ridiculously simple and easy. And! for some reason, the baking dish even comes clean really easily. So if you want a complex, interesting cranberry sauce instead of the usual cloying culprits, you need to try this sauce for your next holiday get together. 


Bourbon Cranberry Sauce
(Slightly adapted from Epicurious)

  • 1 pound (about 4 cups) cranberries
  • 1 1/2 cups sugar
  • 1/4 teaspoon ground cinnamon
  • 1/4 cup bourbon
Preheat oven to 350°F. Combine first 3 ingredients in 9x13-inch baking dish. Cover tightly with foil and bake until cranberries are tender and sugar is dissolved, stirring once, about 1 hour. Remove from oven and stir in bourbon. Refrigerate cranberry sauce until well chilled. (Can be prepared 1 week ahead.) Transfer to bowl and serve.


Friday, December 10, 2010

Aged Eggnog


I love eggnog. It's one of those love/hate kind of things, and I'm firmly in the love camp; it makes me feel all warm and fuzzy inside, and while this might sound cheesy, it gets me in the holiday spirit.

I used to make the Cook's Illustrated recipe, which is delicious, but it's pretty time-consuming because you basically pasteurize the eggs and dairy by heating it all over a very low flame until it reaches a certain temperature. It takes forever, and if you rush it at all, or forget to stir for even a few minutes, you can end up with a curdly mess.

I did that one year, and it made me sad. So when I read about the concept of aged eggnog on Chow.com, I was super excited; not only because it sounds virtually fool-proof, but because I'm lazy.

You see, for this aged eggnog, you mix a few things together and throw them into jars, which then go in the fridge for up to a year. That's it! And just like what happens with the bourbon balls, the aging process tames the harsh bite of the alcohol and makes the eggnog deliciously smooth and mellow.

I'm going to write a disclaimer here, as you'll see on every website that has this recipe: You're taking raw eggs, cream, and milk, and letting it sit for at least a month and up to a year, which would probably cause the FDA to collectively have a heart attack.

The theory behind this technique, though, is that the large amount of alcohol in the mix prevents any nastiness from forming. Plus, in order for anything like salmonella to fester in there, it would have had to be present in the eggs or milk in the first place, which is unlikely. But if rawness scares you, you should try a pasteurized eggnog recipe. Me, I like to live on the edge.


Aged Eggnog
(From Chow.com)
  • 12 large eggs 
  • 2 cups sugar 
  • 1 cup heavy cream 
  • 1 quart (4 cups) whole milk 
  • 1 liter (about 4 cups) bourbon, such as Jim Beam 
  • 1/2 cup dark rum 
  • 1/2 to 1 cup good Cognac or other brandy 
  • Pinch kosher salt 
  • 1 whole nutmeg

To serve (optional):

  • 10 egg whites
  • 1 1/2 cups heavy cream

  • Separate egg yolks and whites. Combine yolks and sugar in a large mixing bowl and whisk until well blended and creamy. Add heavy cream, milk, bourbon, rum, Cognac, and salt, and mix to combine. Bottle it right away and refrigerate it until it’s ready. You can use an old liquor bottle, washed out jars from pasta sauce (like I did), or any other largeish glass vessel.
Allow the eggnog to age for at least 3 weeks and up to a year. (You'll note an improvement after only a week, and it keeps getting better from there.)
 
To serve, pour over ice and grate some fresh nutmeg over the top. If you only have the pre-ground stuff, skip it, and get some whole nutmeg the next time you go to the store. Or, if you want to serve the eggnog in the traditional way, pour it into a punch bowl. In separate bowls, whip 10 egg whites and 1 1/2 cups heavy cream to soft peaks and fold them into the eggnog. Serve in punch cups, garnished with freshly grated nutmeg.


Chocolate Bourbon Balls


If you have bourbon lovers in your familly, you must make this recipe. And you should do it soon, because these no-bake cookies need to age in order to achieve their full, well-rounded potential.

Because these bourbon balls are constructed from pre-made cookies and no perishable ingredients, they can be stored in a cool, dry place for several months. As they age, the sharp edges of the bourbon are smoothed away, and the texture of the bourbon balls improves and becomes smoothly dense. The molasses, cinnamon, ginger, and cloves combine to make that sort of warming winter flavor that makes you feel like you're curled up in front of a roaring fire. These are not treats for kids, though--they still pack a punch.

There are, of course, many recipes for bourbon balls out there. However, every other recipe that I was able to find either called for butter (which would make them less shelf-stable); powdery, metallicy cocoa; or vanilla wafers. Vanilla!? Who wants vanilla bourbon balls? Chocolate and bourbon were made for each other; add some molasses and pecans, and you've got a party.

So really--enlist some help (this is the kind of recipe that's fun to make with another person), roll up your sleeves (it's messy), and get these little nuggets aging in order to have them ready for Christmas.


 Bourbon Balls
(From The Gourmet Cookie Book)

  • 1/2 cup chopped raisins
  • 1/4 cup bourbon
  • 2 cups chocolate wafer crumbs
  • 1/2 cup firmly packed dark brown sugar
  • 1/2 cup finely chopped pecans, plus about another 3/4 cup for rolling the balls
  • 1/4 cup unsulfured molasses
  • 1/2 teaspoon cinnamon
  • 1/2 teaspoon ground ginger
  • 1/4 teaspoon ground cloves

In a small bowl, let the raisins macerate in the bourbon for 15 minutes. In a large bowl, combine well all ingredients except the 3/4 cup chopped pecans for rolling. Form the mixture into 1-inch balls, and roll the balls in the finely chopped pecans. Store the bourbon balls in an airtight container in a cool dark place for at least 1 week before serving.


Wednesday, December 8, 2010

Mocha Chocolate Cookies


I bought the Gourmet cookie book soley for the bourbon balls recipe, but I ended up bookmarking almost every page in the book. The first recipe I tried ended up being a massive failure, and it was all scraped into the trash. It made me very sad, so I was determined to immediately make another recipe.


Because I had all of the ingredients on hand, I decided to make these mocha chocolate cookies, and while they were technically a success, these cookies did not appeal to everyone. All of the people at my work loved them, but it was 2 a.m. and everything tastes pretty good at 2 a.m. Some of the people at Nick's work, however, found them to be too rich.

And they are rich. They're intense. Basically, if you took fudgy, fudgy brownies and turned them into cookies, you would get these guys; they even have the crinkly tops that make me so happy. So if you're a chocolate lover or know someone who is, I would recommend whipping up a batch of these cookies in time for the holidays.

Mocha Chocolate Cookies
(From The Gourmet Cookie Book)
  • 4 ounces unsweetened chocolate, chopped
  • 2 cups semisweet chocolate chips
  • 1 stick (1/2 cup) unsalted butter, cut into bits
  • 1/2 cup all-purpose flour
  • 1/2 teaspoon double-acting baking powder
  • 1/4 teaspoon salt
  • 4 large eggs, at room temperature
  • 1 1/2 cups sugar
  • 1 1/2 tablespoons instant espresso powder
  • 2 teaspoons vanilla

In a metal bowl set over a saucepan of simmering water, melt the unsweetened chocolate, 1 1/2 cups of the chocolate chips, and the butter, stirring until the mixture is smooth, and remove the bowl from the heat.

In a small bowl, stir together the flour, the baking powder, and the salt. In a bowl, beat the eggs with the sugar until the mixture is thick and pale, and beat in the espresso powder and the vanilla.

Fold the chocolate mixture into the egg mixture, fold in the flour mixture, and stir in the remaining chocolate chips. Let the batter stand for 15 minutes. I found that chilled batter worked better, so you might want to let it rest in the fridge.

Drop the batter by heaping teaspoons onto baking sheets lined with parchment paper and bake the cookies in the middle of a preheated 350 degree oven for 8 to 10 minutes, or until they are puffed and shiny and cracked on top. Err on the side of undercooking these cookies--they are meant to be soft and rich. Let the cookies cool on the baking sheets, transfer them to racks, and let them cool completely.


Malfatti: Ricotta and Swiss Chard Dumplings


Do you ever read a cookbook, food blog, or food magazine, and a recipe just reaches out, smacks you, and screams, "You must make me!"? That's what happened to me with this recipe. I don't know why, but when I saw it in this month's Saveur, I instantly decided that I had to try it. And because these little dumplings are basically like ricotta gnocchi, I was finally motivated to make homemade ricotta the way I'd been planning to do for approximately 5 months. 

You can make a whole meal out of these little dumplings, or you can serve them as a side. As an added benefit, they freeze well, and you don't even have to defrost them--just throw them in a pot of boiling water the same way you would with the unfrozen dumplings.


The original recipe called for sage leaves to be gently cooked in some butter along with the boiled dumplings. I tried this and wasn't crazy about it, but I left the sage leaves in the pictures because they looked pretty. You can certainly try adding some sage leaves to the butter as the dumplings cook; if you try it, let me know how you like it. I was kind of thinking that rosemary might work well, and I was also thinking that olive oil rather than butter might be nice. But whether you use herbs or not, you should definitely add pine nuts; they weren't in the original recipe, but in my opinion, they made the dish. And one last change--I used less butter than the original recipe called for because the original recipe called for a total of 16 tablespoons, which I just couldn't do.


Malfatti:
Ricotta and Swiss Chard Dumplings
(Adapted from Sauveur)
  • 1 pound ricotta
  • 1 tsp Kosher salt, plus more to taste
  • 2 bunches Swiss chard (about 2 pounds), tough inner stems removed
  • 1 10 oz box frozen chopped spinach, defrosted (or two more bunches Swiss chard--that's what the original recipe called for)
  • 6 tablespoons butter, melted
  • 1/4 flour, plus more as needed
  • 1/2 teaspoon freshly grated nutmeg
  • 4 egg yolks
  • 1 egg
  • Freshly ground black pepper
  • 2 tablespoons butter
  • A handful of pine nuts
  • Optional: 24 sage leaves
Make your own ricotta and drain it well, or put store-bought ricotta in a cheesecloth-lined strainer set over a bowl and let drain overnight in the refrigerator. Measure 1 1/4 cups drained ricotta and reserve any extra for another use.

Bring a large pot of salted water to a boil and add chard; cook until tender, about 3-5 minutes. Drain chard and let cool. Squeeze chard with your hands to expel liquid. Place chard and spinach in a tea towel and squeeze to remove as much water as possible.

Transfer the chard and spinach to a food processor and pulse until finely chopped. Transfer chard to a large bowl along with the ricotta, 1 teaspoon salt, melted butter, flour, nutmeg, egg yolks, and egg. Season with pepper and mix until smooth.

Test one dumpling--in a large pot of salted water, cook the dumpling until it floats to the surface. If it falls apart during this process, add more flour. Also taste the dumpling for seasoning, and adjust as needed. Using 2 spoons, shape 1 teaspoon at a time into an oval (like making a quenelle). Place the dumplings on a lightly floured baking sheet.

If you're not cooking the dumplings immediately, freeze them at this point. Later, when you would like to cook them, just throw them in a pot of boiling water--there's no need to defrost them first.

In a large skillet, melt 2 tablespoons butter over medium-high heat. Add the pine nuts (add the sage leaves at this point if you would like to use them) and dumplings and cook, tossing frequently, until the pine nuts and dumplings are nicely browned. Serve.


Ricotta


For a while now, I had been meaning to make my own ricotta because I keep reading about how easy it is, and how superior home made ricotta is compared to the store-bought stuff.

Now, technically, this is not true ricotta, as ricotta is actually made  from the whey that's left over at the end of the cheese making process. Really, this is more like a paneer or queso fresco, but it tastes and looks like a ricotta, and can therefore be used in any recipe that call for this cheese, whether the application is sweet or savory.


I read a lot of recipes for home made ricotta, and found that vinegar, lemon juice, and animal rennet, when combined with whole milk and heat, can all create the desired curds. Some people claim that lemon juice, while effective, can lend the ricotta an acidic taste. Surprisingly, vinegar is less noticeable than lemon, and unsurprisingly, rennet makes for the best results.

Because rennet is not easy to find, I went with the vinegar option, and because I'm lazy, I microwaved the milk rather than stirring it forever in a pot on the stove. I mean, heating milk on the stove is tedious, there is almost always a hard to clean up boil-over, and the milk usually scorches on the bottom of the pot, which is also difficult to clean up. A microwave, however, leaves you with a nice, easily cleaned glass bowl.
You can make a lower-fat ricotta by using a reduced fat milk, but it's generally not recommended, as the resulting product will be rather anemic in taste and texture. And, of, course, you want to find the best possible milk.

I used my ricotta in some ricotta and Swiss chard dumplings, but you could also make lasagne, a ravioli filling, cheesecake, or anything your heart desires.


Ricotta
  • 9 cups whole milk
  • 9 tablespoons distilled white vinegar
  • 1 teaspoon sea salt (use more if you want a salty product, and less if you want to use this in a sweet recipe)
Place a colander over a bowl, and line it with 4 layers of cheesecloth or two layers of food-safe paper towels.

Place the milk, vinegar, and salt in a large microwave-safe bowl, and microwave until the curds have separated from the rest of the milk. I started with 5 minutes and continued to heat the milk in 1 minute increments until the milk separated; timing will differ based on the microwave.

The recipes I consulted suggested heating the milk anywhere between 165 and 200 degrees, so start taking the milk's temperature when it begins to separate, and continue to take it periodically until the milk is fully separated, and use the temperatures listed above as a rough guideline.

Using a slotted spoon, transfer the curds to the lined colander, and allow them to drain until the desired consistency is reached, anywhere from 15 minutes to 2 hours.


Tuesday, November 30, 2010

Shrimp, Spinach and Black Bean Quesidillas


Here's a relatively healthy meal that still feels a little bit indulgent. It's great for those nights when you don't want anything too complicated, but don't want to do a college throwback and just each nachos or a frozen pizza. Plus, it's fun to cook (not to mention eat). The amount of cheese listed below is approximate because while it would be delicious with more cheese, we were going for moderation. Add more if you're feeling frisky.


Shrimp and Spinach Quesidillas
(Inspired by Serious Eats)
Serves 2-4

  • 1/2 pound shrimp
  • 2 teaspoons Old Bay
  • Juice of 1/4 of a lime
  • 2 smallish tomatoes, finely diced
  • 2 jalapeños, roasted, peeled, seeded, and diced
  • 2 tablespoons chopped cilantro
  • 1/2 teaspoon ground cumin, preferably freshly toasted and ground
  • Scant 1/2 teaspoon ground coriander, preferably freshly toasted and ground
  • Salt and pepper
  • 2 boxes frozen chopped spinach, defrosted
  • 1 can black beans, drained and rinsed
  • 8 flour tortillas, about 6 inches in diameter
  • About 2 tablespoons butter
  • About 1 cup cheese, such as Monterey Jack, a 'Mexican' blend, or cojita
  • Sour cream, to serve
  • Hot sauce, to serve

Place the shrimp in a steamer basket over boiling water, and sprinkle with the Old Bay. Steam until just cooked through, stirring once, about 5 minutes. Remove from the heat and allow to cool. Once the shrimp are cool enough to handle, peel them, cut them each into 2 or 3 pieces, and place in a medium bowl.

Add the lime juice, tomatoes, 1 of the jalapeños, cilantro, and the cumin and coriander to the bowl. Season to taste with salt and pepper. Taste the mixture and add the other jalapeño if desired. Allow this to sit for 30 minutes.

Melt 1 teaspoon butter in a non-stick skillet over medium heat. Add a tortilla and coat with the butter. Cook, flipping occasionally, until each side is slightly crispy with golden brown spots. Set aside. Add more butter to the skillet if necessary, and repeat with the other tortilla.

When the second tortilla is ready, top it with a couple tablespoons of the cheese of your choice. Follow this with a 1/4 of the spinach, and about a 1/4 of the beans (I say about because you may not want to use all of the beans). Sprinkle with salt. Top with a quarter of the shrimp, and a couple more tablespoons cheese. Top with the previously prepared tortilla.

Cook the quesidilla, flipping once, until the cheese is melted and the ingredients are heated through. Remove to a cutting board, and when cool enough, cut into quarters. Repeat with the remaining 6 tortillas to make 3 more quesidillas. You may find that it is advantageous to use two skillets at the same time, in order to speed up the process.

Serve with hot sauce and sour cream.


Sauerkraut


It's too late to make this sauerkraut for Thanksgiving, but sauerkraut with Thanksgiving dinner is apparently just a Baltimore thing, anyway. If you don't live in Baltimore and have never had sauerkraut as a part of your holiday spread, I would highly recommend that you try it next year--the tartness of the sauerkraut is a pleasing companion to the tart cranberry sauce. I love to take a bite of the stuffing, a bite of the tart sauerkraut, a bite of the turkey, followed by a bite of the tart cranberry sauce--it makes for such a nicely rounded dinner, and helps prevent tastebud fatigue.

While store-bought sauerkraut is vinegary and intense, home-made sauerkraut takes the same fermented, almost pickled cabbage taste, and treats it in a much more delicate, subtle manner, and the sauerkraut becomes almost effervescent. It's like moonshine made in the wilds of the Appalachians versus Baker's or Bookers whiskey. Or like grappa versus Grey Goose. Or like a pie bought at Walmart compared to a homemade pie made with fruits from your own tree...you get my point.

Not only is homemade sauerkraut delicious, it couldn't be simpler--you basically cut up a head of cabbage, toss it with some salt, smoosh it down every once in a while, and set it aside and mostly leave it alone. The most you'll have to do is occasionally scrape some of the scummy stuff off the top of the brine. It doesn't hurt anything, but it can apparently affect the taste of the sauerkraut. That, and you might want to move your setup outside if your house starts to smell like cabbage, especially if your house, like mine, frequently smells of cabbage anyway because your downstairs neighbors like to make their own kimchi. 

Sauerkraut
  • 5 pounds cabbage
  • 3 tablespoons kosher salt

Note: All of the recipes that I consulted directed that the cabbage be put in a crock (a vessel with a round opening and high, straight sides). I don't have a crock, nor do I know anyone who has such a thing, so I used a bowl. My plate fit snugly over the cabbage, so I figured it would work just fine. Perhaps there's a reason to use a crock, maybe it has something to do with evaporation, but I think you'll be okay if you decide to also go with a glass or ceramic bowl. You can even use a food-grade plastic bucket; just don't use metal, as it's reactive.

Remove any outer damaged or wilted leaves, but do not wash the cabbage--its natural bacteria is what's going to do the fermenting. Cut the head of cabbage into quarters and remove the hearts if you would like to, and thinly slice (or shred in a food processor)-you want the slices to be about the thickness of a nickel, ideally. Place the cabbage in the bowl or crock as you go, and sprinkle each layer with some of the salt. When all of the cabbage is in your bowl or crock, mix it up with your hands, then press down as hard as you can on it--you really want that cabbage smashed in there.

Cover the cabbage with a plate that fits snugly inside of your bowl or crock. Weight it with something heavy and clean, like a boiled rock, a big can of tomatoes, or a pitcher full of water. Cover it all with a dishtowel to prevent bugs and dust from getting in there. Let it sit for an hour and wilt. At the end of the hour, remove your weight and smash the cabbage down some more with your hands.

(This is what my setup looked like.)

Periodically, whenever you think of it, mash the cabbage down some more with your (clean) hands. By the next day, the cabbage should have exuded enough liquid that the cabbage is submerged. If not, dissolve a teaspoon of salt in a cup of water and pour it over the cabbage. Continue to do this until all of the cabbage is covered, and there's a bit of extra water over the top of the cabbage.

As the cabbage goes through its fermentation cycle, some water may evaporate, so you might have to periodically add more water. Also, check it every day or two, and remove the scum that has formed on the top. You won't be able to remove all of it, and that's okay--don't drive yourself crazy. The scum/mold is not harmful, and the cabbage is in an anaerobic environment, so nothing bad should be forming in the brine.

The cabbage will ferment more quickly if it's kept inside, but it can also be kept outside if the temperatures are above freezing. Some people claim that a slower fermentation makes for a tastier sauerkraut. In either case, your sauerkraut will be ready in about 3-6 weeks. Taste it occasionally to see how it's progressing, and when it's reached a stage of tanginess that you like, scoop it out into glass jars (with the brine), and store in the fridge.

Saturday, November 20, 2010

Whole Wheat Chocolate Chip Cookies


It's almost time for the holidays, and for me, the holidays mean cookies. In fact, one year I made so many cookies that I lived on a Starbucks and cookie diet. I actually lost weight that year, but I think it's because I was working in a very busy restaurant; when I tried the same experiment as a nurse, it had the effect one would anticipate.

While a cookie diet is not advisable unless you're burning about 3,000 calories per day, making cookies with wheat flour might make one feel a little less guilty about eating a few here and there. There's still a lot of butter and sugar in these bad boys, so they're by no means healthy, and that's not the point, really. The point of using wheat flour is that it lends the cookies a nice toasty depth of flavor, and it tames the sometimes cloying sweetness of the timeless treat. Once cooked, the wheat in the dough is not really noticeable, but it makes these cookies just a tiny bit more interesting than your standard chocolate chip (not that there's anything wrong with the standard chocolate chip).

Here's the difference between these cookies and your 'normal' chocolate chip cookies: when I bring a tray of normal cookies in to work, they get eaten through the course of the night, and people tell me that they're good. When a tray of these cookies are placed on the counter and I disappear into triage for a while, I return to the floor to be greeted by cries of "Leah! Yay!", and an empty plate. I would say that's a wholehearted endorsement, wouldn't you?

I made these cookies because Molly from Orangette highly recommended them, and even said that she might like them better than the famous New York Times recipe, which is quite a recommendation. Like the New York Times recipe, I find that chilling the dough in the fridge overnight makes for a more complex flavor, but it's certainly not necessary. In her post, Molly discusses whether it's best to use whole wheat flour, or white whole wheat flour. I decided to go with a combination of the two, and I thought it worked nicely. Feel free to play with the ratios, though. Just be sure to use bittersweet chocolate as opposed to milk chocolate, as the wheat would overwhelm the generally underwhelming milk chocolate.


Whole Wheat Chocolate Chip Cookies
(Adapted from Good to the Grain, by Kim Boyce, and Molly from Orangette)
  • 3 cups whole wheat flour (see note above)
  • 1 ½ tsp. baking powder
  • 1 tsp. baking soda
  • 1 ½ tsp. kosher salt
  • 2 sticks (8 oz.) unsalted butter, cut into ½-inch cubes (see note above)
  • 1 cup lightly packed dark brown sugar
  • 1 cup sugar
  • 2 large eggs
  • 1 tsp. vanilla extract
  • 8 oz. bittersweet chocolate, roughly chopped into ¼- and ½-inch pieces, or bittersweet chips

Position racks in the upper and lower thirds of the oven, and preheat to 350°F. Line two baking sheets with parchment. (If you have no parchment, you can butter the sheets.)


Combine the flour, baking powder, baking soda, and salt in a medium bowl, and whisk to blend.


Put the butter and sugars in the bowl of a stand mixer fitted with the paddle attachment. With the mixer on low speed, mix just until the butter and sugars are blended, about 2 minutes. Add the eggs one at a time, beating well after each addition. Beat in the vanilla. 

Gradually add the flour mixture to the bowl, and blend on low speed until the flour is just incorporated. Add the chocolate, and mix on low speed until evenly combined. (If you have no stand mixer, you can do all of this with handheld electric beaters and/or a large, sturdy spoon.) 


Using an ice cream scoop (not a huge one, though), scoop mounds of dough onto the baking sheets, leaving enough space for the cookies to expand a bit.

Bake the cookies for 10 to 20 minutes, rotating the sheets halfway through, until the cookies are evenly browned. I found that the cookies are perfectly cooked when the middle parts are still very soft and fluffy and look almost raw, and the edges are getting a little bit firm, a little bit golden, and a little bit drier than the rest of the cookie. Transfer the cookies, still on parchment, to a rack to cool. Repeat with remaining dough.