Showing posts with label Cake. Show all posts

Thursday, December 16, 2010

Salted Caramel Buttercream Frosting


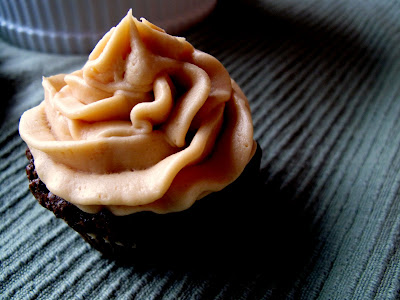
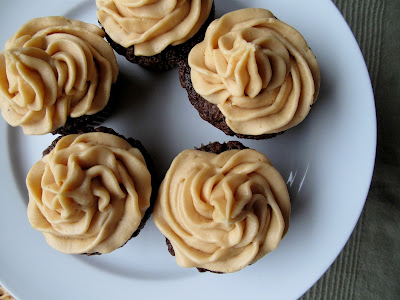
Those are some manly-looking cupcakes, aren't they? Plus, they're far more interesting than the usual chocolate cake with chocolate or vanilla icing--the icing is a salted caramel buttercream. I made these for my brother's birthday, and although he hasn't had much of a sweet tooth since the age of 7, he ate two of them and took a few more home. That's high praise.

Salted Caramel Buttercream
(From Cupcakeblog.com)
  • 2 sticks butter
  • 8 ounces or 1 package of Philly cream cheese
  • 5 to 6 cups powdered sugar
  • 1 cup salted caramel (Below)
Bring butter to room temperature by letting it sit out for 1 or 2 hours. 
Sift 3 cups of powdered sugar into the butter/cream cheese mixture and beat to combine. Add 1 cup of the salted caramel and beat to combine.
Sift 2-3 cups of powder sugar, in 1 cup increments and beating between each, until you arrive at the thickness and sweetness you desire.

Salted Caramel
(From Smitten Kitchen)
  • 1 cup sugar
  • 3 ounces (6 tablespoons) salted butter, the better you can get, the better it will taste
  • 1/2 cup plus two tablespoons heavy cream, at room temperature
  • If you only have unsalted butter, a pinch of salt.
Melt the sugar over medium to moderately high heat in a larger pot than you think you’ll need–at least three quarts (I used six), whisking or stirring the sugar as it melts to ensure it heats evenly. Cook the liquefied sugar to a nice, dark copper color. Add the butter all at once and stir it in. Before turning off the stove pour in the heavy cream (and salt if you're adding it) and turn off the heat (the sauce will foam up quite a bit when you add it; this is why you want the larger pot.), whisking it until you get a smooth sauce.


Use it right away or pour it into a jar and store it in the fridge for up to two weeks. When you take it out, the caramel will likely have thickened a bit but a few seconds in the microwave brings it right back to pouring consistency. We microwaved it covered, in 10 second increments.

Wednesday, August 18, 2010

Cherry Almond Coffee Cake


I've previously mentioned that other people's blogs can be quite inspiring. I actually have a whole email folder chock-full of blogger's recipes that I've mailed to myself as a reminder to eventually cook them. This recipe, from Hungry Cravings, was emailed and made almost right away, partially because it sounded delicious, and partially because I had some cherries that needed to be used up.

I have a sentimental fondness for coffee cake, as my grandmother used to make it on a regular basis. Hers was quite different from this recipe--it had a swirl of cinnamon inside (I could never get enough of that part), and a crumbly top. Come to think of it, maybe I should try to track down that recipe.

This cherry coffee cake is similar to my grandmother's coffee cake in that it has a dense, crumbly crumb, and it's sweet without being too sweet. It's nice to eat for breakfast, as a snack, or for dessert. It's not exactly the kind of cake that you just whip up in a jiffy, but it probably freezes well, and it probably gets easier to make each time it's attempted. This makes a pretty big cake, so be sure to have some willing sharers.


If I make this again, I'll make just a couple little changes. Namely, I'll macerate the cherries in some Bourbon or brandy, and I'll swirl some cherry preserves through the batter. These changes are reflected in the recipe written below, but feel free to omit them if you prefer a  more purist approach.


Cherry-Almond Coffee Cake
(Slightly Adapted from Hungry Cravings)


  • 7 ounces (1 ¾ sticks) unsalted butter, at room temperature, plus more for greasing the pan
  • 11 ¼ ounces cake flour
  • ½ teaspoon baking soda
  • ½ teaspoon baking powder
  • ½ teaspoon fine sea salt
  • 7 ½ ounces light brown sugar
  • 1 ½ teaspoons cinnamon
  • 2 ounces sliced almonds
  • ¾ pound cherries, pitted
  • 1/4 cup Bourbon Or Brandy
  • 6 ounces sugar
  • 3 large eggs, at room temperature
  • The zest of half a lemon
  • 1 teaspoon vanilla extract
  • ¼ teaspoon almond extract
  • 8 ounces sour cream, at room temperature
  • A jar (about 11 ounces) of cherry preserves


Preheat the oven to 350ºF. Thoroughly butter a 9×3-inch round springform pan. In a medium bowl, sift together 9 ounces of the flour and the baking soda, baking powder, and salt. 

In another medium bowl, whisk together 3 ½ ounces of the brown sugar, the remaining 2 ¼ ounces flour, and the cinnamon in a medium bowl. Melt 2 ounces of the butter and add to the bowl. Toss in the almonds.
     In a mixer fitted with a paddle attachment, beat together the remaining 5 ounces butter, sugar, and remaining 4 ounces brown sugar on high for 3 to 4 minutes, or until light and fluffy. Beat in the eggs one at a time until thoroughly combined and then beat in the lemon zest, vanilla, and almond extract.

    Add 1/3 of the flour mixture, then ½ of the sour cream, then 1/3 of the flour mixture, then the remaining ½ of the sour cream, and then the remaining 1/3 of the flour mixture, mixing on low for only a few seconds after each addition until just combined, and stopping the mixer once or twice to scrape down the sides of the bowl. Do not overmix.

    Transfer to the cake pan and spread evenly. In dollops, place the preserves on the top of the batter. Using a butter knife, mix the preserves into the batter so that the preserves form a swirly sort of pattern.

    Arrange the cherries over the batter and then spread the almond mixture evenly over the batter and cherries in the cake pan. Bake for about 1 hour and 15 minutes, or until the edges of the cake start to shrink away from the pan and a toothpick inserted into the center comes out clean.

    Let the cake cool in the pan for about 10 minutes. Remove the sides and bottom of the pan and transfer to a cooling rack to finish cooling completely. (Don't forget this part--I cooked my cake properly, but because I forgot to take it out of the pan, it ended up being overcooked.) Cut into portions and serve.


    Monday, July 12, 2010

    Caramel Cake


     Do you ever feel like the miscellaneous leftover bits of foodstuffs lurking in the depths of your fridge are giving you the evil eye? Woefully staring at you and muttering, "You should really use me. You're so wasteful. I cost money, and there are starving people somewhere, and you're a bad person."
    No? Maybe I just have a guilt complex, but that's what this rich, salty caramel was saying to me. It added, "I'm delicious, and the fact that you decided to be lazy and store me in the sauce boat means that I'm really in the way."

    Oh, what to do? Luckily, inspiration struck with the help of a fellow blogger, who made a white cake with a caramel icing. 'Hey,' I thought, 'I could just make a fluffy white cake and pour the caramel on top! Brilliant!'
    What was not brilliant, however, was putting the cake in the oven, pouring a glass of wine, and taking some cheese and crackers out to the porch in order to bask in the glorious evening.
    "I totally will not forget that I put a cake in the oven. It'll be just fine."

    Of course, I walked back inside for a refill, and was greeted by the timer's persistent 'BeepBeep! BeeeeepBeep!'
    'Oh, man. I wonder how long that's been going off.'
    Well, all was not lost. I scraped the overcooked bits off the bottom and pretended that this confection was supposed to be dry and dense rather than light and fluffy. Plus, the caramel, much like Spanx on a fat girl (which I'll need after all this baking), worked to hide some of the cake's imperfections.
    Also effective was pouring a bit of milk onto the plate on which the cake rested. Sort of like a tres leche cake. But not really. It did make it a little more moist, though. Or, like Nick's co-worker discovered, the traditional glass of milk on the side worked quite nicely, as well.

    The caramel and cake combined to make the kind of not-too-sweet dessert that has you coming back for one more little slice, and then another little one, okay, just one more tiny little one. In fact, it was yummy enough that I might just have to make this cake again in order to score myself a redemption, and to use up that last little bit of caramel, as its gaze is becoming increasingly malevolent.
    The cake can certainly be redeemed because for one, it's a Julia Child recipe, and because it's simple and inexpensive. And the caramel? It needs no redemption, it just needs to be eaten. I know I can do it.
    Julia Child's Biscuit Au Beurre 
    Butter Sponge Cake

    • 4 tablespoons butter
    • 2/3 cup sugar
    • 4 egg yolks
    • 2 teaspoons vanilla extract
    • 4 egg whites
    • Pinch of salt
    • 2 tablespoons sugar
    • 3/4 cup cake flour

    Butter and flour a 10 inch cake pan. Preheat the oven to 350 degrees. Melt the butter and set aside to cool.

    Gradually beat the sugar into the egg yolks, add  the vanilla, and continue beating for several minutes until mixture is thick, pale yellow, and forms ribbons.

    In a separate bowl, beat the egg whites and salt together until soft peaks are formed; sprinkle on the sugar and beat until stiff peaks are formed.

    Scoop one fourth of the egg whites over top of the egg yolks and sugar mixture. Sift on one fourth of the flour, and delicately fold in until partially blended. Then add one third of the remaining egg whites, sift on one third of the remaining flour, fold until partially blended, and repeat with half of each, then the last of each and half of the tepid, melted butter. Do not over mix; the egg whites should retain as much volume as possible.
    Turn into the prepared cake pan and tilt the pan to run the batter to the rim all around. Set in the middle of the preheated oven and cook for 30-35 minutes. The cake is done when it has puffed, is light brown, and has just begun to show a slight line of shrinkage from the edges of the pan. Note--Julia Child states that the cooking time is 30-35 minutes. I have found, however, that the cake is ready far earlier than that--I would suggest that you start checking the cake at 15 minutes.

    Remove from the oven and let stand in the pan for 6-8 minutes. It will sink slightly and shrink more from the edges of the pan. Run a knife around the edge of the pan, and reverse on cake rack, giving the pan a sharp little jerk to dislodge the cake. If cake is not to be iced, immediately reverse it so its puffed side is uppermost. Allow to cool for an hour or so.

    Wednesday, February 3, 2010

    Le Marquis, or Chocolate Sponge Cake


    Issues, people, issues.

    I'm having baking issues. Remember how I said that I don't like to have baked goods around the house, and I don't like cake? Well, explain why I've made 2 cakes in a week. I guess I'll blame it on the fact that it's February, the time of year when I become starved for sunlight and go into hibernation mode.


    So this time, I made Le Marquis, or Chocolate Sponge Cake, also from Mastering the Art of French Cooking.

    This cake is pretty much the same as the other, but first I melted some chocolate with some strong coffee in a double boiler.

    Julia Child had said something about putting chocolate in a covered pot and putting that pot inside of another pot, but it just didn't make much sense to me. A bowl set over some simmering water worked just fine.

    I should probably mention that I realize that Julia Child was not the only author of Mastering the Art of French Cooking, but I use her name exclusively for the sake of ease.


    Meanwhile, egg yolks were combined with sugar and beaten until they reached the ribbon stage.


    When the chocolate was 'tepid,' it was combined with the egg yolk mixture.


    Egg whites were beaten to stiff peaks and combined with the chocolate mixture. The hard part, though, was folding in a quarter of the egg whites, a quarter of the flour, and repeating until it was all combined.

    I mentioned that I'm not too good with the whole folding thing, so I wasn't surprised when my cake didn't rise the way it was supposed to. It was apparently supposed to come above the lip of the cake pan by a quarter of an inch.

    That totally didn't happen. Plus, the cake again cooked in way less time than Julia said it would, so I felt that it could have used a couple less minutes in the oven.


    That's okay, though, because it was pretty yummy. Perhaps it was supposed to be lighter, fluffier, and airier than it was, but who knows?

    I can't tell you what the cake was supposed to taste like, but I can tell you that it was satisfyingly chocolaty without being overwhelmingly dense, and I can tell you that my coworkers devoured it.

    I got exiled to the PACU (post anesthesia care unit) for a while, and some of the secretaries called me back there to tell me that they love me. Maybe that's why I keep making cakes. I'm buying love with baked goods.

    But remember how I said 3 desserts ago that I was not going to eat again until my birthday? Obviously, that didn't happen, and I pigged out at La Scala anyway. It was delicious, and a lot of fun. I ate a chocolate cannoli all by myself, and I could have eaten another one. If you ever go there, you should get the grilled Caesar salad and a chocolate cannoli.

    Cannolis are one of those foods that a lot of people claim to not like. I agree that most cannolis are terrible, but I can tell you that the cannolis at La Scala in Baltimore will change your mind. They're nothing like the cloyingly sweet rock-hard tubes of blandness that most people call cannolis.

    After dinner, we came home and walked to our friend's house. It's pretty cool that we're neighbors, because instead of driving around in the snow after dinner, we got to hang out some more in front of a fireplace.

    That's right, it was snowing. Again.

    There was a time when I didn't even bother to make birthday plans because it would inevitably sleet and/or snow, and it's such a bummer when your friends cancel on your birthday plans, even if it's for a good reason. So I made plans this year, and it snowed. Shocking!

    And you know what? I was going to do some more birthdayish stuff with the family on Saturday, but they're now calling for snow that will be "measured in feet, not inches." Awesome.

    That's okay, though, because it will be a good excuse to make something from the Braise book, and I'll get to stay at home and eat it. None of that driving to work in the snow junk.
    And definitely none of that "bring a bag because you will not be allowed to leave" stuff.

    I'll just be doing some sitting by the fire and stuffing my face stuff.


    Le Marquis
    (Chocolate Spongecake, from Mastering the Art of French Cooking)

    • 3 1/2 ounces of semi-sweet baking chocolate
    • 2 tablespoons strong coffee
    • 3 1/2 tablespoons softened butter
    • 3 egg yolks
    • 1/2 cup granulated sugar
    • 3 egg whites
    • Pinch of salt
    • 1/3 cup cake flour, turned into a sifter

    Butter and flour a round 8 inch cake pan (1 1/2 inches deep). Measure out the ingredients.


    Place the chocolate and coffee in the small pan, cover, and set in the larger pan of simmering water. Remove pans from heat and let chocolate melt for 5 minutes or so while you proceed with the recipe. Then beat in the butter.


    Beat the egg yolks in the mixing bowl, gradually adding the sugar, until the mixture is thick, pale yellow, and forms a 'ribbon' when the beaters are lifted out of the bowl.


    Beat the egg whites and salt together in a separate bowl until soft peaks are formed; sprinkle on the sugar and beat until soft peaks are formed.


    Fold the tepid chocolate and butter into the batter, then fold in one fourth of the flour and continue folding, alternating rapidly with more egg whites and more flour until all egg whites and flour are incorporated.


    Immediately turn batter into prepared pan and run it up to the rim all around. Bake in the middle level of pre-heated oven for 25 minutes, or until cake has puffed 1/4 inch above the rim and the top has cracked. Note: I always find that these cakes are done way before the suggested 25 minutes, so keep a close eye on your cake. A skewer or straw should come out clean when plunged 1 1/2 inches from the edge, but should be slightly oily with a few specks of chocolate clinging when plunged into the middle area.


    Let cool 10 minutes; cake will sink slightly. Run a knife around the inside of the pan, and reverse onto a rack. Let cool 2 hours before icing, if you plan to ice the cake. Or, you can serve it with just a sprinkling of powdered sugar.


    Saturday, January 30, 2010

    Gateau A L'Orange Et Aux Amandes, or Orange and Almond Spongecake with an Apricot Glaze


    When I woke up today, it was snowing. Again.


    Despite the fact that I had made a tart the day before, I decided to make a cake because it's a nice snow day activity. Break out the fat pants.

    I realized that I hadn't yet made anything from Mastering the Art of French Cooking, and I had liked the look of some of the cakes in that book. I sure am making a lot of baked goods considering how much I whined about how many the random number generator picked for me, aren't I?

    I wanted something relatively simple, for which I didn't have to buy many ingredients. Flipping through, I noticed the orange almond sponge cake and remembered that I have clementines in the fridge, and I had ground up some almonds for yesterday's tart.

    Casting an apprehensive glance at the snow, I preheated the oven. I like what Heather said one day about the snow: "When you can stay home, it's all Winter Wonderland-y, but when you have to go out in it, it's like The Shining." Exactly.

    I was thinking along the lines of The Shining, because I had to go to work in a few hours. The fact that I was going to work, though, was one of the reasons I was inclined to make this cake--because I had a way to get rid of it. Did you see how much of that lemon tart I ate? Yeah, this cake was so not staying in the house.


    Speaking of snow, when it's snowing and you're a nurse, it's a lot like what Garrett and I said in the previous post about being on call. Before I was a nurse, I used to think that it was kind of cool and exciting that you have to get to work no matter what's happening outside. People will even pick you up! Who cares if they're some potential psycho who randomly volunteers for the job and drops you off with no means of getting home? Cool!

    Actually, it's not cool, so while I watched the forecasted 1-2 inches of snow become 4, then 6 inches, I just told myself that if I got stranded in a ditch somewhere on the way to work, at least I wouldn't starve.


    I mentioned that I had some ground almonds left over. Of course, it wasn't enough, so I had to make more.


    Then it was time to zest some oranges.


    Okay, I used clementines, but that's close enough, right? I'm crazy for clementines, but I was worried that these little guys would go to waste.


    Next it was time to separate some eggs.
    I was supposed to combine the egg yolks and the sugar and beat them until they reached the ribbon stage. I did this yesterday, so when Julia included a reference to instructions for this technique in the recipe, I thought that I was too cool to read that part.


    Or even if you do hold on to the little bowl, you'll end up with splatters in your hair, on the fridge, and plastered to the dishwasher?

    So the egg yolks and sugar went back into the big bowl. Finally, I gave up. Something was not right here. Maybe I should read Julia's instructions. Ooohhh...You add the sugar gradually, and then mix it only to a certain point, or the yolks will get grainy. Ooohh.
    Obviously, I did that part over.

    To the properly beaten egg yolks, I added the lemon zest, lemon juice, and some almond extract.

    Then the ground almonds, followed by the flour.
    So far, no more mishaps. I mixed in some melted butter with no catastrophic results, so it was time to whip some egg whites to stiff peaks.

    Again, I did this yesterday, so no problem, right? Well, I do sometimes learn from my mistakes, so I read Julia's directions this time, and I think I got it right.

    The egg whites were then folded into the batter, and poured into the prepped cake pan.

    The cake cooked in far less time than Julia said it would, but luckily I noticed and took it out in time. You're probably thinking that my oven was the wrong temperature, right? Well, it might have been, because I do have an oven thermometer just like I'm supposed to, but I think it's wrong. It's all good, though, because I didn't overcook the cake.

    The cake cooled for 10 minutes, and just like Julia told me to, I took a sharp knife, ran it around the edge, and turned the cake out. Or part of the cake.
    I pried the rest out and kind of smooshed the pieces together, but I was so distracted by this that I forgot to flip the cake over. That means that the finished cake has some really appealing cooling rack lines running across the top.

    I liked the idea of an apricot glaze, and I just happened to have exactly the needed amount of apricot jam in the fridge. This was combined with sugar and cooked in a sauce pan until it reached 225 degrees. I think. I was too lazy to take pictures at this point, so I was definitely too lazy to get out the thermometer. I'm pretty sure it was right, though.

    The finished cake was flipped over ("crap!"), smooshed together again, and glazed. It actually doesn't look that bad.

    Or didn't. I was so worried that I'd be late to work because of the snow that I managed to put my lunch box and
    my bag on top of the cake and the tart. The cake should still taste pretty good, though. Before I smashed it, it was light and moist, and both the citrus and the almond flavors are noticeable without being cloying or overwhelming.

    I had been worried that the glaze wouldn't work, but it's actually perfect. It isn't too sweet, and it is quite nice with the other flavors. You can get bites with the glaze, and bites without the glaze, so the variety keeps the relatively simple cake interesting. Overall it is subtly, Frenchily delicious. And I won't be eating any more of it. I swear.


    Gateau A L'Orange Et Aux Amandes
    (Orange and Almond Spongecake,
    from Mastering the Art of French Cooking)

    • 1/4 pound butter
    • 2/3 cup granulated sugar
    • 3 egg yolks
    • the grated rind of 1 orange
    • 1/3 cup strained orange juice
    • 1/4 teaspoon almond extract
    • 3/4 cup (4 ounces) pulverized almonds (you can use a food processor to do this, just be sure not to process the almonds too long and make almond butter)
    • 1/2 cup cake flour, turned into a sifter
    • 3 egg whites
    • Pinch of salt
    • 1 tablespoon granulated sugar
    • Optional: Apricot Glaze (below)

    Preheat the oven to 350 degrees.
    Butter and flour the cake pan, and measure out all of the ingredients.


    Melt the butter and set aside.
    Gradually beat the sugar into the egg yolks and continue beating until the mixture is a thick, pale yellow, and forms a ribbon when the beaters are lifted out of the mix. Add the grated orange rind, orange juice, and almond extract. Beat for a moment or two until the mixture is light and foamy. Then beat in the almonds, and finally the flour.


    Using a rubber spatula, fold the cool, melted butter into the cake batter, omitting milky residue at the bottom of the butter pan. Stir one fourth of the egg whites into the batter, delicately fold in the rest.


    Immediately turn into prepared cake pan and run the batter up to the rim all around. Bake in middle level of preheated oven for 30 to 35 minutes. Note: I find that the cakes in this book tend to be done way before the indicated time, so keep a close eye on things. The cake is done when it has puffed, browned lightly, top is springy when pressed, and a needle plunged into the center of the cake comes out clean.


    Remove from oven and let stand for about 10 minutes, until cake begins to shrink from the edges of the pan. Run a knife around the edge of the pan and reverse the cake on the rack, giving it a small, sharp, downward jerk to dislodge it from the pan. If it is not to be iced, reverse the cake immediately so it will cool puffed-side up. Allow to cool for an hour or two.


    Can be served with powdered sugar, or with apricot glaze (below). You can also use a buttercream frosting.


    Apricot Glaze

    • 1/2 cup apricot preserves, forced through a sieve if lumpy
    • 2 tablespoons granulated sugar

    Stir the strained apricot preserves with the sugar over moderately high heat for 2 to 3 minutes until thick enough to coat a spoon with a light film, and the last drops are sticky as they fall from the spoon (225 to 228 degrees on a candy thermometer). Do not boil beyond this point or the glaze will become brittle when it cools.


    Apply the glaze while it is still warm. Brush any crumbs off the top of the cake, and using a pastry brush, the back of a spoon, or a wide, flat knife, spread the glaze around the top of the cake. Unused glaze will keep indefinitely in a screw-topped jar. Reheat again before using.


    So I broke out the mixer and mixed. And mixed. And mixed. This wasn't working. Okay, I'll put it in a smaller bowl, and maybe it will mix up more effectively.

    Did you know that if you put something in a little bowl and try to use the hand-held mixer without holding on to the bowl, the bowl spins around right along with its contents and sprays stuff everywhere?