Showing posts with label Entree. Show all posts

Tuesday, November 9, 2010

Pizza With Caramelized Onions, Broccoli Rabe, and Goat Cheese


 This pizza was inspired by a recipe over on Smitten Kitchen, and it's remained a perennial favorite in our house, particularly in the winter. It's the kind of pizza that makes a well-rounded meal, and the hearty greens are enough to convince you that you can eat pizza and be nutritionally virtuous at the same time.

The bitterness of the broccoli rabe, the sweet caramelized onions, and the tangy goat cheese become more than the sum of their parts, and when some chewy pizza dough and some garlic oil are thrown into the mix, this pizza makes a just about perfect meal.

I know that some people are turned off by the bitterness of hearty winter greens, but I assure you  when the broccoli rabe is joined by its culinary companions, the bitterness becomes an asset and gives the whole pizza a delicious balance. Plus, whereas some hearty greens benefit from a long cooking time, the broccoli rabe cooks in just a few minutes. Also a nice benefit is the fact that this pizza requires no fresh herbs. So if your herb garden has died, or you don't feel like buying expensive fresh herbs, you're in luck.


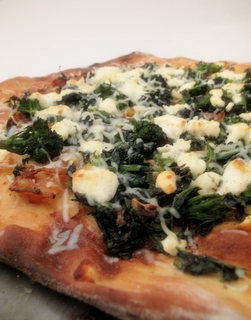
Pizza with Caramelized Onions, Broccoli Rabe, and Goat Cheese
  • 1/2 recipe pizza dough
  • 2 medium onions
  • 4 teaspoons canola oil
  • 1 tablespoon butter
  • Kosher salt
  • 3 cloves garlic, minced
  • 2 tablespoons good extra-virgin olive oil
  • 1 bunch broccoli rabe (also called rapini)
  • Pinch red pepper flakes
  • A couple pinches sugar, or a squeeze of agave nectar
  • 3-4 ounces goat cheese
  • Very good extra-virgin olive oil, for drizzling
Optional:
  • 1/2 cup Monterey Jack cheese
  • Lemon, cut into wedges
While the pizza dough is rising, slice the onions. In a skillet, heat 2 teaspoons canola oil over medium heat, and add the onion. Cook until very soft and caramelized, about 30 minutes. If the onions start to dry out, add a tablespoon of butter. Salt to taste while cooking.

While the onions cook, combine the minced garlic and the good olive oil in a little bowl. Set aside. Cut off the bottom inch or two of the bunch of broccoli rabe, so that the dried-out, tough parts of the stem are removed. Chop the rest of the bunch into small, bite-sized pieces. Wash thoroughly.

In a large skillet, heat 2 teaspoons canola oil over medium-high heat. Add the broccoli rabe (it's okay if there is still some water clinging to the leaves). Add salt to taste, and a pinch of red pepper flakes, and saute until tender, about 7 minutes. Taste the greens. If they are very bitter, add the couple pinches of sugar or the squeeze of agave nectar. Remove from heat.

When the dough has been rising for about 45 minutes, preheat the oven (with a pizza stone in place) to 500 degrees.
When the dough has almost doubled in size (about and hour and a half), stretch it out into a 12-inch circle. It helps to take your fingertips and make divets all over the surface of the dough, then spread with the palms of your hands, pushing outward. Repeat until the dough is the desired size.

Spread the garlic oil over the surface of the pizza, leaving a 1/2-inch border. Using a peel or an inverted pizza sheet, slide the dough onto the pizza stone. Cook until the dough is getting firmer and is taking on a teeny-tiny bit of a golden color, about 5 minutes.

Remove the pizza from the oven, and close the oven door. Spread the onions over the surface of the pizza. Spread the broccoli rabe over the onions, and cover the whole thing with the goat cheese. Return to the oven and cook until the crust is golden brown and the goat cheese is melted a bit.

Remove from the oven and sprinkle with a bit of salt, the Monterey Jack if you're using it, and the very good olive oil. Sometimes this pizza benefits from a sprinkle of lemon juice, and sometimes it doesn't need it, so perhaps serve some lemon slices on the side. Cut into wedges and serve.


Thursday, October 14, 2010

Pasta with Roasted Cherry Tomatoes


This recipe has lately been a favorite of mine. Really, though, it's one of those recipes that's so simple that it probably shouldn't even be called a 'recipe.' It's particularly nice for those nights when you don't really feel like cooking dinner, but would feel like too much of a slacker were you to just throw something in the microwave.

And don't worry too much about the fact that it's no longer technically tomato season--cherry tomatoes are frequently quite satisfactory even in the off-months. The tomatoes, once they've been gently roasted, become concentrated in flavor, and the slight charring adds both flavor and sweetness. The garlic cloves and chile de arbol lend the dish a nice piquancy, and the fresh herbs add some brightness. With some good olive oil and maybe a bit of dried spices, the result is pasta heaven.

You'll notice that I called for a handful of fresh herbs, but did not specify any particular type of herb. I usually use basil, thyme, and oregano, and I've also found that parsley and a bit of rosemary work nicely. You could also try marjoram, sorrel, and savory. That's one of the things that I like so much about this recipe--you can use any herbs that you happen to have lying around, and the result will be delicious.

If you feel like being extra spiffy, you can grate some bottarga over the top before serving. Bottarga is the cured roe sack of a tuna or mullet, and it's highly prized in Italy. I recently aquired some because the fact that I had never tried it was driving me crazy. As to whether it was worth the price, the jury is still out--it tasted and smelled a bit like Nick's fish tank, but not in a bad way. I think that it will grow on me, and in any case, I was not going to be able to let the idea go until I tried it. If you feel like trying bottarga, or if you already have some, this is exactly the kind of dish with which it's usually eaten.


Pasta with Roasted Cherry Tomatoes

Serves 2
  • 1 pint cherry tomatoes
  • 2 teaspoons olive oil
  • 1/2 teaspoon salt
  • 1/4 teaspoon freshly ground black pepper
  • 7 garlic cloves, separated but unpeeled
  • 1 chile de arbol, broken in half
  • A handful of fresh herbs
  • 8 ounces pasta, the shape of your choice
  • Optional: Italian seasoning and red pepper flakes
  • Optional: Bottarga
Preheat oven to 350 degrees.
Slice each tomato in half and place them on a sheet pan that's been lined with foil or parchment. Toss with the olive oil, salt and pepper. Scatter the garlic cloves and chile de arbol in amongst the tomatoes.

Scatter the herbs over the tomatoes and roast in the center of the oven, until the tomatoes are shriveled and are brown at the edges, about 40 minutes. (Depending on the tomatoes, though, this can take 35-55 minutes.) The tomatoes will look something like this when they initially go into the oven.


When the tomatoes look like they're getting soft, put a large pot of salted water on to boil. Cook your pasta according to package directions. Drain and toss with 2 tablespoons olive oil and a heavy sprinkling of Italian seasoning and red pepper flakes, if you're using them.

Divide the pasta between two plates. Remove the garlic cloves and herbs from the tomatoes, and cover each bowl of pasta with half of the tomatoes. If desired, grate bottarga over each plate.

Tuesday, October 12, 2010

Ham and Spinach Lasagne


We couldn't decide what to get for dinner the other day, and we ended up buying some dry-cured ham. In the store, it looked like a teeny little ham, but it turned out to be two pounds. Now, two pounds is a lot when you're talking about a wet-cured ham (the only kind we had ever previously eaten), but it's a whole lot when you're talking about a rich, salty, dry-cured country ham.

On the ham's first night, we made a delicious Potato Gratin to go with it, but still had a lot left over. The leftovers made some delicious sandwiches, but I feared that the rest would go to waste. Some brain storming, though, led to the idea of a lasagne.

Now, lasagne is not one of my favorite foods. Yes, it's pasta and I love pasta, but I just don't love lasagne because it's generally heavy in a bad way (not a potato gratin way), the noodles are thick and goopy, and it's just not too interesting.

But I thought that very thin homemade egg noodles might nicely replace the thick, slimy noodles that are generally the undoing of a potentially good pasta dish. Not only would they be delicate and tasty, there would be no need to cook them in a pot of water. There would be no handling of molten hot ribbons of slipperiness, there would be no breakage of noodles, and there would be no messing around with the reportedly sub-par 'no-cook' lasagne sheets.

The other part of the heavyness problem, I thought, was the ricotta. I think that it's a stealth player, in that it seems innocuous enough and light enough, but secretly, it's adding more slimy, gunky heaviness to the dish. Homemade ricotta might be an improvement, but I just didn't have time for that. Therefore, there was to be no ricotta in this lasagne.

The third part of my lasagne plan involved doing away with the ubiquitous tomato sauce. There's nothing wrong with a tomato sauce, and I love tomato sauce, but I just didn't think that it would play nicely with the ham.

Therefore, this white lasagne recipe from Epicurious sounded perfect--no ricotta, no tomato, just a nice bechamel, and I basically made the printed recipe and added the ham and spinach. Like some of the reviewers of the original recipe mention, it is important to taste everything along the way--your bechamel should taste great before it's added to the dish. And don't do what I did and forget to add the flour to the butter before adding the liquids. That's what a bechamel is, and I managed to mess that part up.

Lastly, a lot of lasagne recipes call for eggs, and I've come to the conclusion that the eggs play the same role of saboteur as the ricotta. In fact, I felt like the eggs ruined my laborsome work of art. They turned a silky, beautiful bechamel into a curdly mess, and their flavor almost overwhelmed the more delicate flavor of the white sauce. Therefore, there are no eggs in the recipe printed below.

So mess-ups and all, this is now my answer to lasagne--thin, homemade noodles, a tasty bechamel, and some simple additions. The leftovers are delicious, and if you're expecting company, the lasagne can be assembled ahead of time and kept refrigerated until you're ready to start cooking; just add a few minutes to the cooking time.


Ham and Spinach Lasagne
(Partially adapted from Epicurious)

  • A one-pound bag of frozen spinach
  • One recipe homemade pasta
  • 1 cup finely diced cooked ham, or about 6 ounces prosciutto, diced
  • 3/4 cup minced  shallots
  • 8 tablespoons unsalted butter
  • 1/2 cup all-purpose flour
  • 1/2 teaspoon (freshly!) grated nutmeg
  • 3 3/4 cups whole milk
  • 1 cup chicken stock
  • 1/2 cup dry Marsala or Sherry
  • 1 teaspoon sea salt
  • 1 cup grated Parmesan-Reggiano
  • Freshly ground pepper
  • 1 tablespoon very good extra-virgin olive oil
Place the frozen spinach in a colander in the sink, and allow it to defrost. If it's taking forever to defrost, run some water over it and stir it all around occasionally.

Make the homemade pasta up to the point where it is wrapped in plastic wrap and allowed to rest. Preheat oven to 350°F with rack in middle.

Cook shallots in butter in a heavy large saucepan over medium heat, stirring occasionally, until tender, about 4 minutes. Add flour and cook over low heat, stirring with a wooden spoon, 3 minutes. Add nutmeg, then slowly whisk in milk and stock.

Bring to a boil, whisking, then simmer, stirring occasionally, just until sauce lightly coats back of spoon, about 1 minute. Do this very slowly, as impatience can lead to a curdled and/or burnt sauce. Remove from heat and cool to warm, stirring occasionally. Stir in Marsala or Sherry, sea salt, 1/2 teaspoon pepper, and 1/2 cup cheese. Be sure to taste the sauce at this point, and add more salt and pepper to taste.

While the sauce cools, squeeze as much water as possible out of the spinach. Place it in a large bowl and drizzle with the tablespoon olive oil. Add salt and pepper to taste and toss until combined.

Divide the dough into about 6 pieces, and re-wrap the 5 that you will not be using immediately. With your plain roller set to the largest setting (lower number), pass the dough through once. Fold like a book (one flat piece in the back, and two pieces folded over on the sides so that they almost meet in the middle) and pass through again. Fold like a book and repeat 2 more times.

At this point, you want the pasta sheet to be almost as wide as the rollers, so that as the pasta is stretched further, it becomes as wide as the rollers. After the last time, send the pasta through as is. Then, put the roller on the next smallest setting and pass the dough through. Continue to do this on smaller and smaller settings until the pasta is the desired thickness. For this recipe, I used the smallest setting. You can also use the second-smallest setting if you want the noodles to be a little bit noticeable, as opposed to totally melted into the other parts of the lasagne. You'll have a very long sheet that you will cut to the length of your baking dish.

Spread about 1 1/4 cups sauce over bottom of an 11- by 8-inch baking dish. Sprinkle about a quarter of the spinach and a quarter of the ham over the sauce-it will be a rather sparse covering. Cut your pasta sheet to the appropriate length, and cover the sauce with as many sheets as necessary (you'll probably need 2).
 
Repeat layering 3 more times, then top with remaining sauce and remaining 1/2 cup cheese. (You might not need all of the pasta dough. If not, it can be rolled out, cut into noodles, and dried.) Bake, uncovered, until browned, 45 to 55 minutes.
  
Cooks' note: Sauce can be made 1 day ahead and chilled, covered (once cool).


Tuesday, October 5, 2010

Thomas Keller's Roast Chicken


There was a time when I didn't like roasted chicken. I'm not really sure why, but perhaps I had eaten only bland and unexceptional specimens up to that point. Or maybe what changed my mind was the common food writer's musings about roasted chicken as one of the litmus tests, like omelettes, that indicate a chef's skill.

Roasting a chicken, like making an omelette, is one of those things that anyone can do, technically, but it apparently takes some skill to do well--thus, the litmus test theory. Here's one of the many articles that ponder this eternal question in a much more eloquent fashion than my skills will allow.

Plus, a lot of chefs and food writers claim that a well-roasted chicken is the perfect meal, one that they'll take any day over fancier fare. I don't know about that, but I do know that a roasted chicken sometimes hits the spot, it makes for nice leftovers, and it's nice to have the carcasses for making stock.

When I decided that it was time to set out on the quest for the holy grail of the perfectly roasted chicken, I figured that Thomas Keller was a good place to start. In fact, he amusingly talks about learning to roast a chicken in the French Laundry Cookbook (it involves knife throwing).

This recipe, which has become my go-to recipe, came from Epicurious courtesy of Thomas Keller. Key points to note are the importance of trussing the chicken (the pictures show an improperly trussed chicken, so don't go by that), the importance of getting it really, really dry, and cooking it on high heat. 

Some recipes will tell you to stuff the bird with all kinds of stuff, rub all kinds of tediously chopped-up herbs under its skin, or to start at one temperature in one position, and later change to another temperature while flipping that really hot hunk of protein into another position. Ignore all that--simple is oftentimes best, as demonstrated by the Master Thomas Keller.


  • Thomas Keller's Favorite Simple Roast Chicken


  • One 2- to 3-pound farm-raised chicken
  • Kosher salt and freshly ground black pepper
  • Optional:
  • 2 teaspoons minced thyme
  • Unsalted butter
  • Dijon mustard


      Preheat the oven to 450°F. Rinse the chicken, then dry it very well with paper towels, inside and out. The less it steams, the drier the heat, the better.

      Salt and pepper the cavity, then truss the bird. Trussing is not difficult, and if you roast chicken often, it's a good technique to feel comfortable with. When you truss a bird, the wings and legs stay close to the body; the ends of the drumsticks cover the top of the breast and keep it from drying out. Trussing helps the chicken to cook evenly, and it also makes for a more beautiful roasted bird.

      (Here, here, and here are some web pages that explain how to do this. Pay no attention to my pictured trussing, as it is incorrect--it just works for me.)

      Now, salt the chicken—I like to rain the salt over the bird so that it has a nice uniform coating that will result in a crisp, salty, flavorful skin (about 1 tablespoon). When it's cooked, you should still be able to make out the salt baked onto the crisp skin. Season to taste with pepper.

      Place the chicken in a sauté pan or roasting pan and, when the oven is up to temperature, put the chicken in the oven. I leave it alone—I don't baste it, I don't add butter; you can if you wish, but I feel this creates steam, which I don't want. Roast it until it's done, 50 to 60 minutes. Remove it from the oven and add the thyme, if using, to the pan. Baste the chicken with the juices and thyme and let it rest for 15 minutes on a cutting board.

      Note: Make sure that your ventilation system is working well, as this cooking method can create a good deal of smoke. If you have an old potato laying around, you can slice it and put it in the bottom of the pan. This will result in lessening the amount of smoke, and you'll get some delicious but fatty roasted potatoes.

      Remove the twine. Separate the middle wing joint and eat that immediately. Remove the legs and thighs. I like to take off the backbone and eat one of the oysters, the two succulent morsels of meat embedded here, and give the other to the person I'm cooking with. But I take the chicken butt for myself. I could never understand why my brothers always fought over that triangular tip—until one day I got the crispy, juicy fat myself. These are the cook's rewards.

      Cut the breast down the middle and serve it on the bone, with one wing joint still attached to each. The preparation is not meant to be superelegant. Slather the meat with fresh butter. Serve with mustard on the side and, if you wish, a simple green salad. You'll start using a knife and fork, but finish with your fingers, because it's so good.


      Tuesday, August 10, 2010

      Ratatouille and Pan-Seared, Oven Roasted Pork Tenderloin with a Rosemary Vermouth Pan Sauce


      I love ratatouille. I was making it even before that cute movie with the rat waltzed this dish into the spotlight. Did you know that Thomas Keller consulted on that movie, and he came up with the recipe on which the rat's ratatouille was based? That's why it looked so awesome. After seeing that movie, I wanted to make some of this Frenchy stew immediately. And I would have, except that it was January and this, to me, is summer food.

      I therefore usually make ratatouille at least once every summer, and I had been meaning to make it for a few weeks now. I even bought a cute little eggplant at the farm stand thinking that it might end up in some ratatouille. Instead, it lingered on the counter and turned to mush. I suck.

      Then I came across this article in the Guardian's blog. In it, Felicity Cloake eloquently and amusingly expounds on ratatouille in all its various permutations. And I was inspired...So here you go:


      Ratatouille

      • 4 tablespoons olive oil, divided
      • 1 large onion, diced
      • 1 red bell pepper, diced
      • 1 green bell pepper, diced
      • 5 cloves garlic, thinly sliced
      • Salt
      • 1/4 cup dry white wine
      • 1/4 teaspoon red pepper flakes
      • 2 medium eggplant, cut into 1/2 inch dice
      • 3-4 zucchini
      • 28 ounce can whole tomatoes*
      • 1 bay leaf
      • 2 teaspoons chopped fresh thyme
      • 1/4 thinly sliced fresh basil
      • 1 1/2 tablespoons chopped fresh parsley
      Heat 1 tablespoon olive oil in a large dutch oven, and sauté the onion, peppers, garlic, and 1/4 teaspoon salt until the vegetables are soft (about 10 minutes). Add white wine, and increase heat to high. Simmer until the white wine is almost completely evaporated, about 4 minutes, and stir in the red pepper flakes. Turn heat off.

      Meanwhile, heat another 2 tablespoons olive oil in a large skillet, add the eggplant, sprinkle with salt, and sauté until the eggplant is tender and a little bit seared. You only want to cook it about half way, which will take about 7 minutes. When the eggplant is sufficiently softened, add it to the onion pepper mixture in the dutch oven.

      While the eggplant is cooking, cut the zucchini in half lengthwise. Cut each half in half lengthwise again, so that you have 4 long pieces. Cut these pieces across in 1/4 inch segments so that you are left with little quarter-moon pieces. Open the can of tomatoes and leave them in the can. Using kitchen shears, cut the tomatoes into smaller pieces.


      Heat the remaining olive oil in a large skillet and sauté the zucchini until the pieces are a little bit brown, and the soft centers are just becoming a bit translucent. Again, you only want them about half-way cooked.

      Add the tomatoes and bring to a simmer. Add this mixture to the dutch oven and add the bay leaf and thyme.

      Gently simmer the contents of the dutch oven until the flavors are melded and the vegetables are tender but not mushy, about 40 minutes to an hour. Stir in the basil and parsley, and season to taste with pepper, and more salt if necessary.

      *I know that it probably seems wacky to use canned tomatoes in the height of summer, but I find that fresh tomatoes tend to have a flavor that is too lacking in assertiveness for this dish. Plus, canned tomatoes are more economical for me right now, as my tomato plants turned out to be super sad specimens this year.
      If I did make this with fresh tomatoes, however, I would consider roasting them first.

      **************************

      I love ratatouille with pork, and there just happened to be a lovely pork tenderloin in the freezer. Rather than simply brushing it with salt, pepper, and oil and grilling this tenderloin (which is yummy), we decided to go oldschool.

      The rosemary in the pork's sauce was a perfect counterpoint to the basil and thyme in the ratatouille. We had some pork tenderloin, some ratatouille, and some garlic mashed potatoes, and we were in Happy Fat Land.

      We used to make this recipe all the time, and we sort of OD'd on it. It seemed, though, that it was time to brush the dust off of its sheltering folder. And wow. This tenderloin is easy, delicious, and healthy. Why had we neglected it for so long?


      Pan-Seared, Oven Roasted Pork Tenderloin with a Rosemary Vermouth Pan Sauce

      • 1 pork tenderloin
      • Kosher salt and freshly ground black pepper
      • 1 tablespoon butter
      • 1 1/2 tablespoons brown sugar
      • 1/2 cup thinly sliced shallots
      • 1/4 cup vermouth
      • 2 cups chicken stock
      • 1-2 teaspoons chopped fresh rosemary
      Preheat the oven to 400 degrees.
      Coat the tenderloin with salt and pepper, and in a large skillet, heat 1-2 tablespoons canola oil over high heat. When the oil is shimmering, sear the tenderloin on all sides until it is golden brown (about 4 minutes per side).

      Place the tenderloin on a foil-lined baking sheet and cook in the center of the oven until the internal temperature reads 135 degrees. Remove the tenderloin and allow it to rest.

      In the meantime, melt the butter in the same skillet that was used to sear the tenderloin. Add the brown sugar, 2 tablespoons of water, and the shallots. Over medium heat, cook the shallots until soft, about 15 minutes.

      Increase the heat to high and add the vermouth. If there are any brown bits remaining on the bottom of the pan, scrape them up with a wooden spoon or silicone spatula. When the vermouth has almost completely evaporated, add the chicken stock and a teaspoon of the rosemary.

      Over high heat, simmer the stock until it has been reduced to a thick sauce. Taste for seasoning and add salt and pepper, and the rest of the rosemary if desired. (In the winter, we like to use all of the rosemary, but in the summer we prefer a more mild rosemary flavor.)