 If you can call an event of two years standing a tradition, then you could say that my family has a Valentine's Day tradition; namely, we make a nice dinner and hang out. Not a big deal, but a fun change from the usual depressing restaurant scramble.
It started last year when, for the first time in forever, Nick and I both had off on Valentine's Day, and we didn't know what to do with ourselves. We didn't especially want to make a nice dinner and stay at home because we do that all the time, and we were certainly not going to go to a restaurant.
Why do I say that? Because we both worked in restaurants long enough to know that if you go out on Valentine's Day, you'll be fighting your way through hordes of amateurs in order to be given sub-par food from the too-busy kitchen by a server who just wants to get you the heck out of that table because you're just a lousy two-top, and there are a million more behind you.
I don't mean to sound all anti-Valentine's Day, and I'm not going to whine about how it's a Hallmark holiday invented exclusively for commercial ends. I think it's a cute idea, but it seems rather silly when you've been together for over a decade.
On the other hand, maybe that's when you most need days like Valentine's Day, but I frequently find that days like Valentine's Day and New Years inherently come with so much pressure to make a special day out of them that it oftentimes backfires and you're left broke, grouchy, and disappointed.
Thus, the family V. Day was born. We figured that we wouldn't be sitting home doing the ordinary thing, we would be with people we love (which is, after all, the point), it's bound to be fun, and there's no pressure.
Here are some pictures from last year:


 Super fun.
So this year, I wanted a meal that was special without being expensive, rich without being overly fancy, and highly portable.
This is what I came up with:
 Hot Italian sausage, broccoli rabe sauteed with garlic, green pasta with a goat cheese scallion filling tossed in an olive butter, and gateau a l'orange chat.

Kidding. She's not dessert, she just likes to sleep in the bowl, and we disturbed her. I don't know why she likes to sleep in that bowl, but she does. Call the Health Department!
Did you know that female orange tabbys are very rare?
So I started prep the night before and I started by making the dough for the real dessert--Lemon Bars from Ad Hoc. I know that lemon doesn't exactly scream Valentine's Day, but Whole Foods once again had Meyer lemons for a great price, so I had some sitting in a fridge. And while this isn't an anti-Valentine's Day sort of night, but I figured there was no need to go with the usual chocolate dessert. I once again wanted some bright, sunny lemony-ness in the snow-covered depths of winter.
Back to the dough--this dough was quite unlike anything I've ever made before; it was sort of half cake and half tart. It started with creaming sugar and butter together in the stand mixer.
Which, by the way, I was actually able to do. You see, I had the bright idea to buy a stand mixer on eBay because I'm too broke to pay the retail price. I not only managed to buy two stand mixers and thereby establish a self-imposed ban on eBay buying, I bought one without the paddle attachment because I thought that the dough hook and whisk would be just fine.
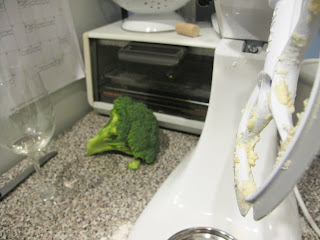
Not so. It turns out that the paddle attachment is way more useful than the dough hook. Remember how I bent the whisk this past Christmas? Well, when it came time to get my birthday present, Nick thoughtfully went to get me a new whisk. This, however, turned out to be a complicated endeavor, so he ended up with the paddle attachment. Little did he know that it was exactly what I needed, and I had been putting off buying one.
Not that you care, though.
So I creamed together the butter and sugar, added some vanilla and a bit of flour, and that was that.
The dough was wrapped up and put in the fridge for later assembly. Now it was time to make the lemon curd. This process involved mixing together eggs, sugar and lemon juice, then adding butter.

I've mentioned before that I like really tart lemon desserts, so I was perturbed by the lack of lemon zest. I know, I know--I've also said that I like to make recipes the way they're written the first time, and I've said that Thomas Keller is The Man, and I'll do whatever he tells me to do.
So I went looking for the microplane zester, but it was nowhere to be found. And I mean nowhere. I looked for that little bugger for a long time, but it was to no avail. I think that Thomas Keller is such a mad genius that he knew I was going to attempt just such a move, so he snuck into my house and stole my zester.
So I tried using the tiny little holes on the side of the box grater, and this is what happened:
 The zest just got all stuck in those little holes. What are they for, anyway?
So no zest went in the curd. Mr. Keller, if I promise not to mess up any more of your recipes, can I have my zester back? I like it a lot. Thank you.
When the curd was finished, its top was covered with plastic wrap, and it, too, was set aside to await later assembly. Or at least most of it was. It was so delicious that I just could not help taking the occasional spoonful or three, partially because it was so deliciously tart. I'm sorry, Master Keller; I'll never doubt you again!!
I should also mention that when I woke up that afternoon, yes afternoon, I mixed together some flour, water, salt and yeast for Jim Lahey's ciabatta bread and let it sit there because that's all you have to do. On Valentine's day, the first thing I did was dump out the dough and push it around in order to get its second rise started.

In the meantime, I made the green pasta dough by blanching some spinach (I read the directions properly this time), and mixed the chopped leaves with the eggs.

This all went into a flour well, and the egginess was spun around until it was combined with the flouriness.

 The resulting dough was then kneaded for 10 minutes. There are times when 10 minutes go by in the blink of an eye, but not so much when you're pushing some dough around. It really does take 10 minutes for the dough to achieve the proper texture, though, so no slacking here.
 When I finally finished and the dough was resting, I made the pasta filling by mixing together the goat cheese and scallions, olive oil, Parmesan, eggs, salt, pepper, and a pinch of nutmeg. Oh great. I need the microplane zester for the nutmeg.
 Can I please have it back, T.K.? The box grater sufficed for this task, though.
 At some point the bread was baked, and it was then time to roll out the tart dough. Eeesh. It was super-dry and crumbly when I first made it, but I had been hoping that the rest in the fridge would alleviate this problem.
Not so much. I did manage, though, to roll it out into an almost-rectangular shape. It was then flipped over into a half sheet pan, and the bits that broke were kind of smooshed back over to the edges. Like I've said before, that's the good thing about tart-like desserts--when you mess up the dough, it's not noticeable in the final product.
The tart shell was baked until golden, cooled, the lemon curd was poured in, and the whole thing went into the freezer. Thomas Keller states that freezing the dessert provides the curd with a lovely texture, "Somewhat firm but amazingly creamy." I wouldn't really know because my last-minute butt had this in the freezer a little too late, but more on that later.
Now it was time to roll out the pasta dough.
 Every time I make pasta, there is some point at which I become fearfully convinced that this time, it's just not going to work. Sometimes it's when I'm swirling the eggs into the flour. Sometimes it's when I'm kneading the dough, but this time it was when I was rolling it out.
 Actually, when I make pasta there are times when I think that none of those steps are going to work, but the necessary alchemy does somehow transpire.
The pasta was cut into "squares" and filled. I say "squares" because it turns out that I lacked the ability to cut the dough into uniform shapes that even remotely resembled squares, and my ravioli were therefore of wildly different sizes and shapes. Whatever. They'll overcook in the same time.
That's right, I overcooked the pasta. It's the penguins' fault.
 I was just about ready to pull the pasta out of the boiling water when this penguin picture fell Splat! right in. I suppose they missed their usual watery environment. When I yelled, "F*&$!" my Dad probably thought that I had wrought massive destruction in his kitchen. Not quite massive, but I am sorry about the picture.
By the time I had fished out the penguins and run in a couple circles, the pasta was overcooked, and it didn't help that it was then tossed in a warm olive butter sauce. Oh, well. It was still delicious enough for Hunter to state that he could eat it every night of the week. That's quite a review from the guy who claims not to like pasta.
"That's not pasta," he says. Okay.
I liked it, but goat cheese is one of those things that's difficult to eat after you've been smelling it for hours. More problematic for me was the fact that it got a bit grainy when cooked. It's probably my fault somehow, though, and it still tasted quite delicious.
 The sausage were excellent, and the broccoli rabe was awesome. Broccoli rabe is another one of those supposedly simple things that I just can't ever seem to cook properly. I've tried big-pot blanching and steaming followed by sauteing, and I've ended up with water-logged florets, even after thorough draining. I've tried just straight-up sauteing both the whole spears and the spears in pieces, and I end up with textural issues both ways. This time, however, I was inspired by a recipe that instructs you to peel the stalks. I think it was from a Mario Batali recipe, although it's a very Frenchy thing to do.
 I don't know if it was the peeling that did it, or if the trick was to understeam them, but the broccoli were perfect. Yay, me.
After dinner, it was time to assemble the lemon bars. Thomas Keller instructs you to loosen the edges by running a knife around the edges of the sheet pan, and to lift the whole thing out and transfer it to a platter. Yeah, right, I said. This whole thing is totally not coming out in one p...ummm...it totally did.
Okay! I'm sorry I doubted you! Again!
You're then supposed to cut the whole thing into squares, which you are to reassemble. I did this part, but I didn't cut off the crust edges like he told me to. Sorry! I really like crust and couldn't bear to part with it. I don't care if it's not pretty. I probably shouldn't have admitted to that, though, because I'm totally not getting that zester back now.
I had previously made meringue, which I had brought with me in a plastic container. The recipe states that ideally, the meringue is to be made right before serving the bars. I know that, but it just wasn't going to happen.
You know what else wasn't going to happen? Piping the meringue onto the reassembled bars in pretty little spirals.
I might have done that if I had been at home, but it was so not happening at someone else's house. What I did instead was make quenelles, and placed one or two on each of the bars. Good enough.
It was then time to brown them. T.K. says that you can skip this step it you must, but I decided not to be a slacker for once, so I broke out the torch. There's no need, by the way, to get a fancy $30 torch from some place like Williams-Sonoma. A $10 torch from the hardware store works just as well.
 Okay, almost as well. My particular torch cannot be turned horizontally, or it extinguishes itself. No problem--just hold the food at an angle.
This is what Hunter thinks of the torch:
 I had mentioned before that the lemon bars never had a chance to freeze all the way. Therefore, they sort of started oozing almost right away, and I didn't get a chance to experience what Keller describes as a "great" texture.
That's okay, though, because they were still delicious, and satisfyingly lemony in a way that kept me eating more and more of them. That's why I got Nick to take them to work the next morning--I didn't trust myself to be around them long enough to take them to work that night.
Nick's coworkers loved them, and one person even knew that they were made with Meyer lemons rather than regular lemons. These bars are another example of how contrasting textures create a dish that is just impossible to stop eating. In this case, the crisp shell filled with the oozy lemon curd and the fluffy meringue made a compulsively edible team.
I have to say, though, that I might prefer plain old lemon meringue pie, because the bars, while delicious, were just a bit too sweet for me. They weren't a pointless saccharine, though, as they were also rather rich, which helped support the sweetness.
Overall, I would have to say that this dinner was much better than a restaurant dinner would have been, and it was pressure-free. Who cares if what you cook for your family isn't perfect? They'll love you anyway, right?
Goat Cheese and Scallion Ravioli with Black Olive Butter
(From Molto Italiano)
Makes 6 servings
- 1 1/4 pounds green pasta dough
- 2 cups fresh soft goat cheese (about 1 pound)
- 1/4 cup freshly grated Pecorino Romano
- 1/2 cup extra-virgin olive oil
- 1 large egg, lightly beaten
- 6 scallions, thinly sliced
- Pinch of freshly grated nutmeg
- Slat and freshly ground black pepper
- 6 tablespoons unsalted butter
- 2 tablespoons olive paste
- 1/4 cup freshly grated Pecorino Romano
Divide the pasta dough into 4 pieces. Roll each piece through the thinnest setting on a pasta machine and lay the sheets on a lightly floured surface. Cut each sheet into 12 three-inch squares. Cover with a towel.
To make the filling, combine the goat cheese, Pecorino, olive oil, egg, scallions, nutmeg, and salt and pepper to taste in a large bowl and mix until well blended.
To assemble the ravioli, place 1 scant tablespoon filling in the center of each pasta square. Fold the two opposite corners together to form a triangular pillow, gently pressing out any air pockets, then press the edges together to seal; if the pasta is a little dry, moisten the edges with a little water to help them adhere. Transfer to a lightly floured work surface.
Bring 6 quarts of water to a boil in a large pot, and add 2 tablespoons salt.
Meanwhile, to make the sauce, combine the butter and olive oil paste in a 12-inch sauté pan and heat over medium heat, stirring, until the butter is just starting to bubble. Remove from the heat.
Gently drop the ravioli into the boiling water, reduce the heat to a low boil, stir to separate the ravioli, and cook until the pasta is tender, 3 to 4 minutes. Remove from the water with a slotted spoon or a skimmer, draining well, and place in the pan with the sauce. Simmer for 1 minute over low heat.
Transfer the ravioli to a warmed serving platter, sprinkle with the Pecorino, and serve immediately.


